Every couple of weeks our Hertfordshire rag ruggers gather together for our Rag Rug Coffee Morning in Great Wymondley near Hitchin (except during self-isolation at the moment). It’s such a nice occasion to see what others are making and to get inspired by their creations, all whilst having a good natter over tea and biscuits naturally.
One of our regulars at the coffee morning is a very talented and crafty lady called Heather. She actually used to make things for big, fancy window displays in London and even made a Father Christmas outfit for Mohamed Fayed one time. What a claim to fame!
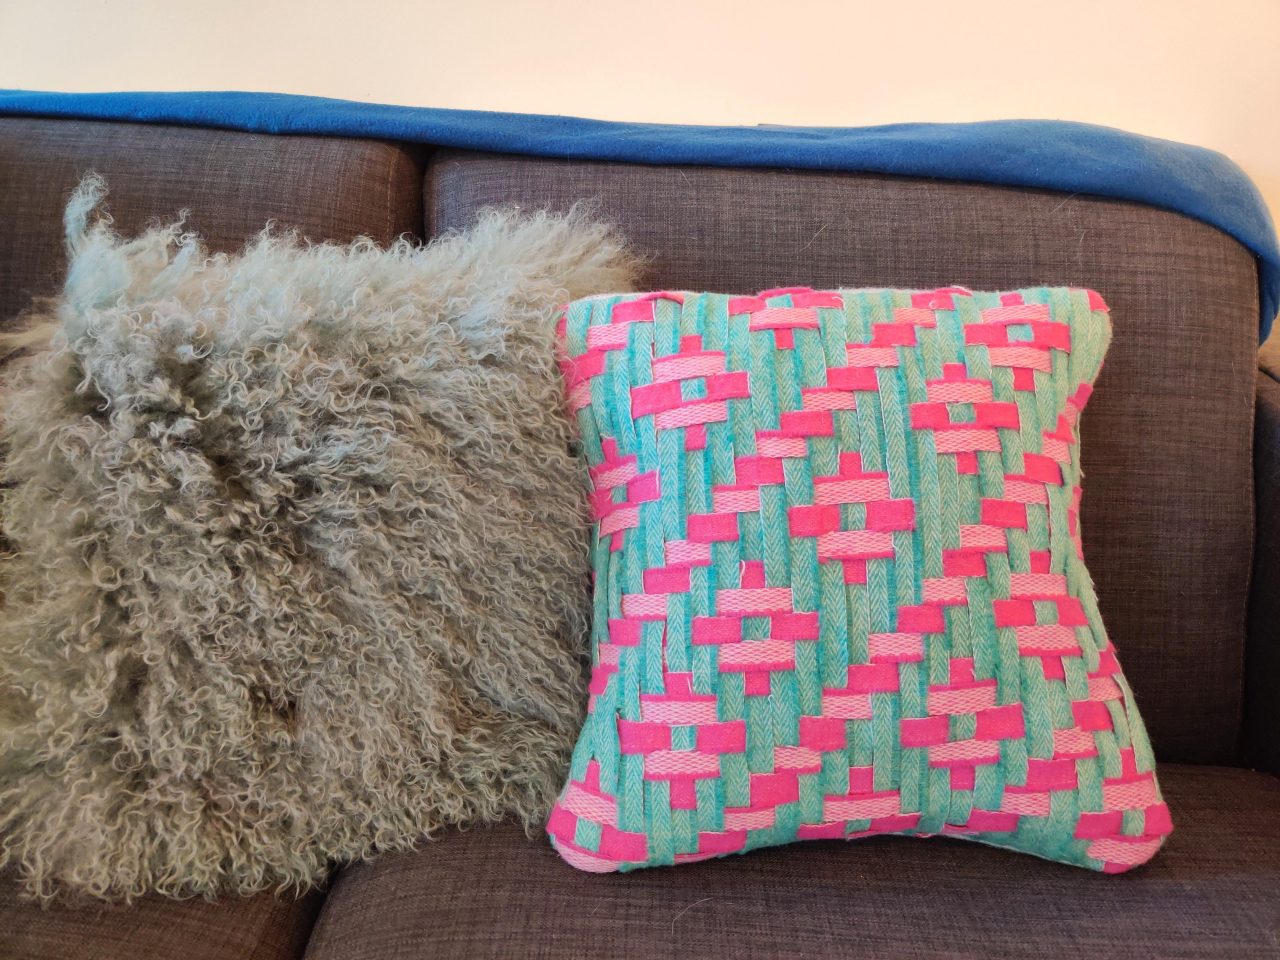
Well, just before Christmas Heather finished a cushion using our beautiful 100% Wool Blanket Yarn, and although the front looked very cool (made using the traditional loopy and short shaggy rag rug techniques), it was the back that I was most intrigued by, as it was something I’d never seen before…
Heather’s Cushion as modelled by Heather…
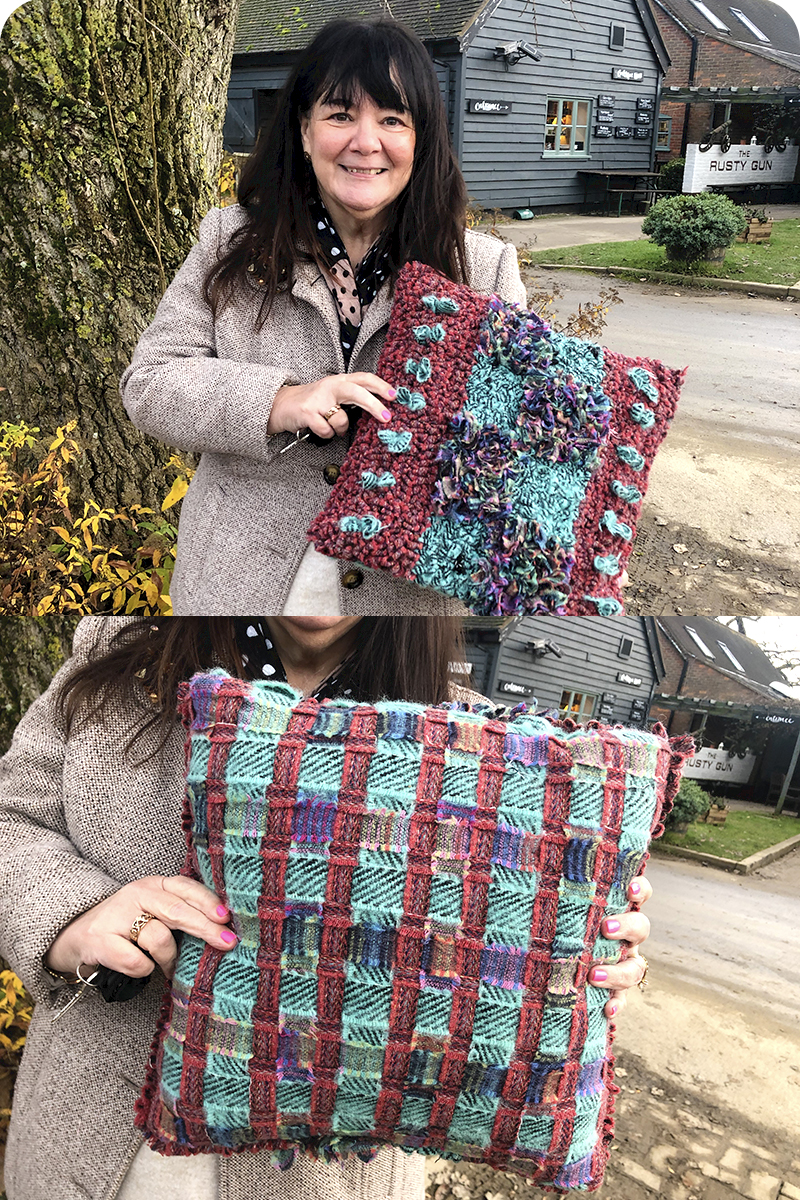
Heather had cleverly used a ribbon weaving technique to make the back of the cushion. Personally, I thought it looked great and I couldn’t wait to give it a go. Cue this blog post…
What is ribbon weaving?
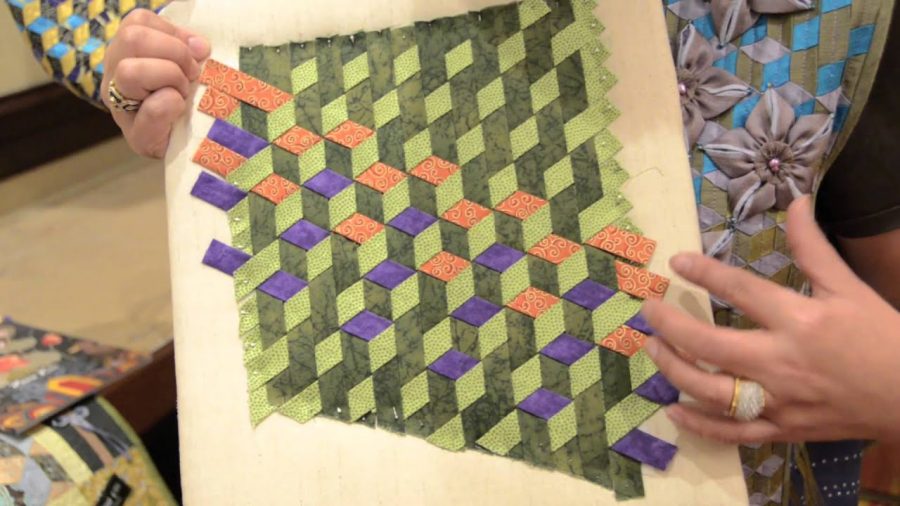
I’m no expert, but from what I’ve read, ribbon weaving is a basic form of weaving, which involves intertwining ribbons to create different patterns and colour combinations. It doesn’t require much equipment and is easy for anyone to have a go at. You can create very simple designs or incredibly complex ones like this from Rami Kim:
The things I like most about ribbon weaving are:
- It seems very accessible. I can imagine everyone enjoying it from people with arthritic hands to young kids.
- It’s so quick! Where as a 40 x 40cm cushion takes me around 3-7 hours to rag rug, depending on the design, a woven blanket yarn cushion only takes me around 1-2 hours, including the assembly.
- There are so many applications. Below, we’ve just experimented with making cushions while we get the hang of things, but there’s nothing to stop you using this same technique to make everything from bags and throws to statement pouffes. Oh dear, as if we don’t have enough to do.
- It brings out the best in the blanket yarn. When you cut up the blanket yarn to rag rug with, sometimes you lose the pattern. However, when you ribbon weave with it, you can really see the detail and stitching in each strip.
So, that’s a little about ribbon weaving, below is how we got on…
Ribbon Weaving with Blanket Yarn:
For me, a good craft day isn’t necessarily complete without good company. Hence I roped in Sany, one of our ace Ragged Life makers and friends. Heather had let me photograph a few pages from a ribbon weaving book she had in her collection, so we used that as the starting point. Below are a few different ribbon weavings that we’ve done so far…
As you can probably tell, we were more pleased with some of the designs than others. I’ll let you decide which 🙂 We’re still at the beginning of our blanket yarn weaving experiment, but below covers a basic “how to”.
How to Make a Ribbon Weaving Blanket Yarn Cushion:
The below will make a 40 x 40cm size cushion, but the steps can be adapted for any plush project.
What you will need:
- Blanket yarn (buy 500g of 100% Wool Blanket Yarn off the Ragged Life website and will receive at least two different colours. 500g will make more than one cushion). If you want more variety then let us know when you check out and we’ll see what we can do.
- A cork board (minimum 50cm x 50cm). You can also use a thick piece of cardboard if you don’t have a cork board.
- Drawing pins – I used these ones.
- Lining fabric (a 50 x 50cm piece. I used thin cotton)
- Iron on interfacing (50 x 50cm piece. I used a medium weight)
- Iron
- Backing fabric for your envelope back (two pieces, both 50 x 35cm. I used a medium weight cotton or woollen blanket)
- Clothes pins
- Sewing machine
Step 1: Choose your ribbon weaving design
We soon discovered that there are soooo many iterations of these ribbon weaving cushions that you can make. You can play around with the below variables and probably even more…
- The number of different blanket yarns you use
- The pattern that you weave them in
- The width of the strips
- The pattern or plain design of the blanket yarn
- The texture of the blanket yarns
- The direction of the warp and weave
What we discovered pretty early on is that you can achieve a lot using just a couple of colours. In fact, the pattern shines through well with plain colours and simple designs. Below are a few of the patterns we experimented with and the number of blanket yarns we used for each…
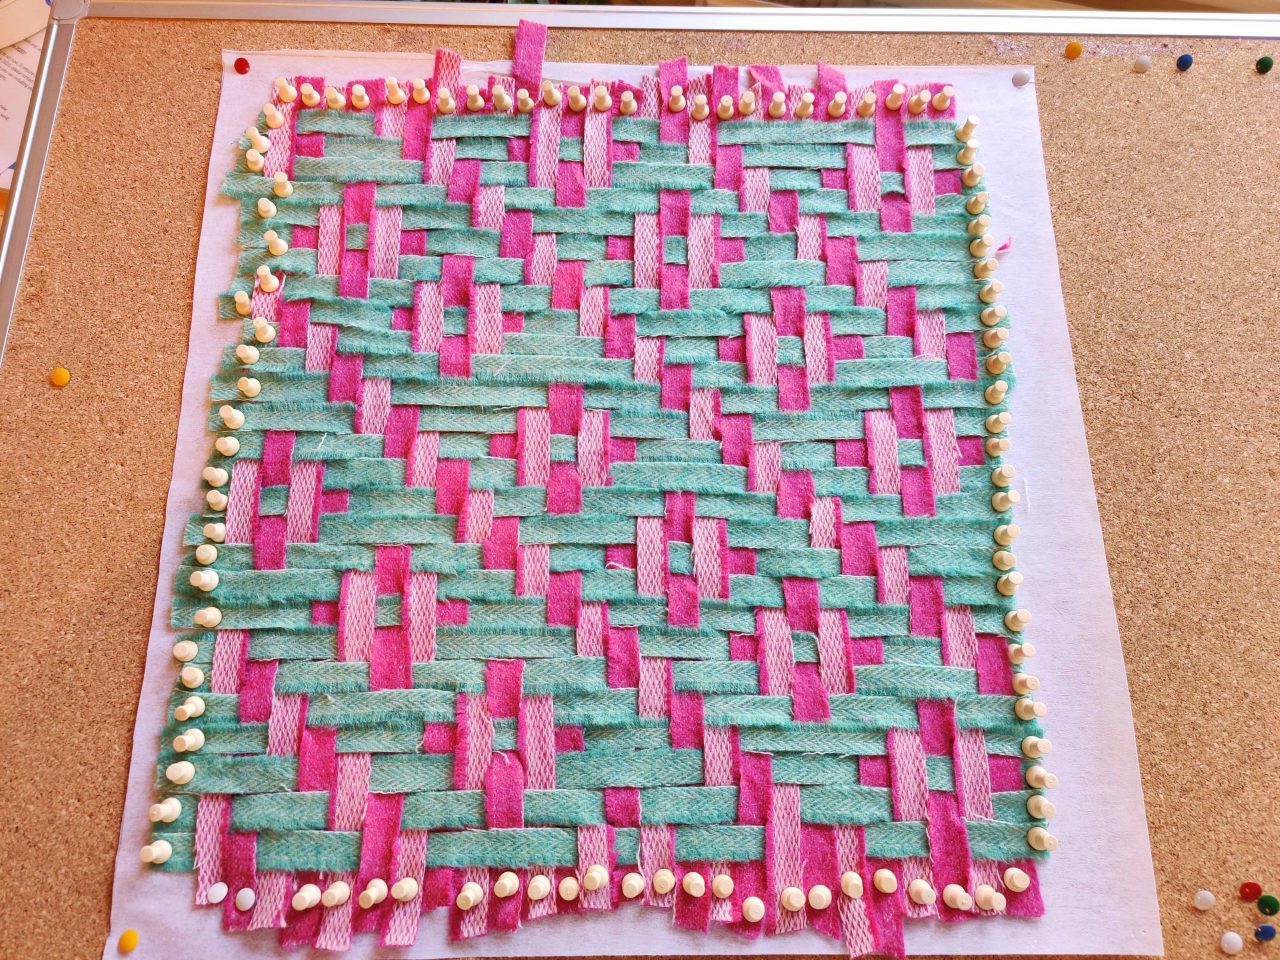
Herringbone: 2 colours 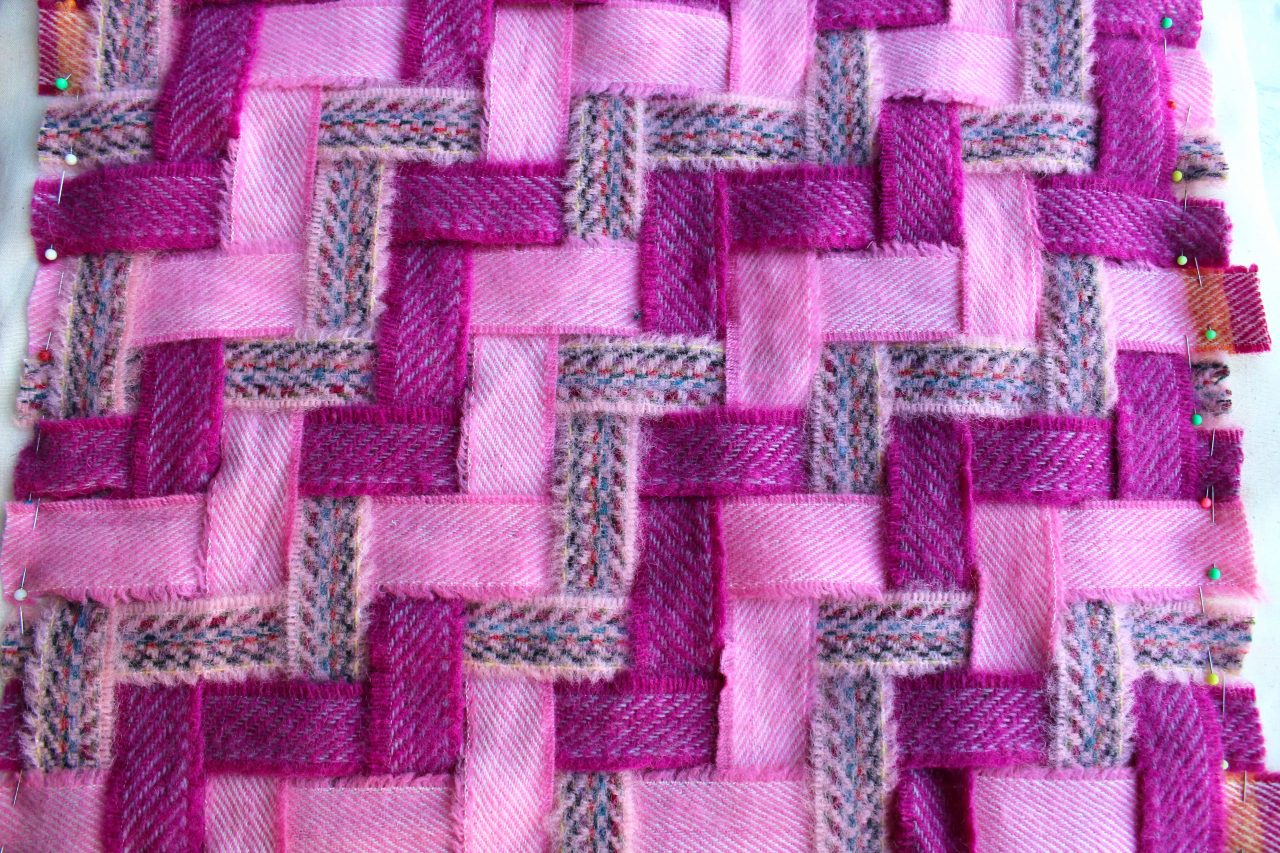
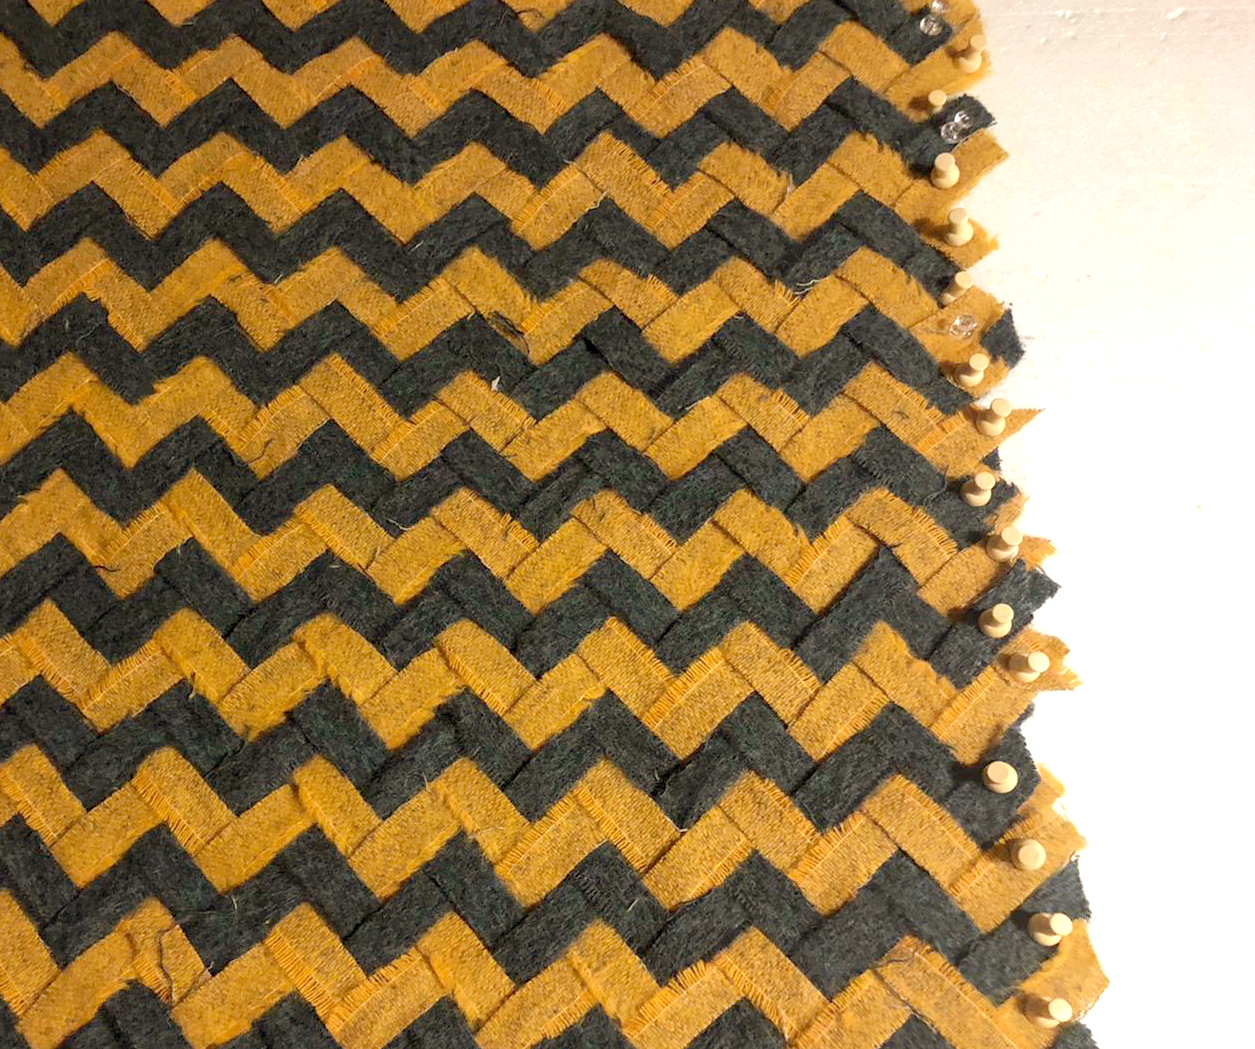
Chevron: 3 colours 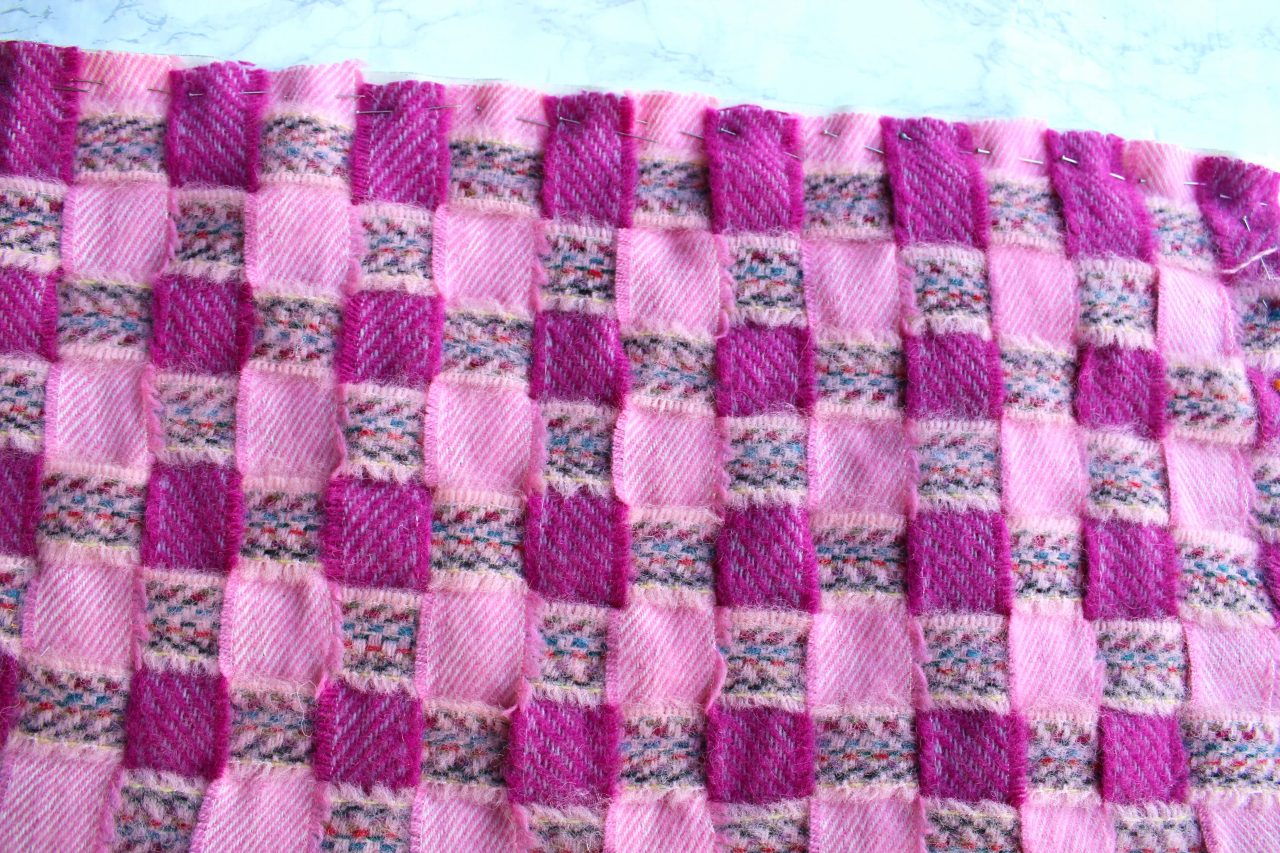
Simple Over Under: 3 Colours 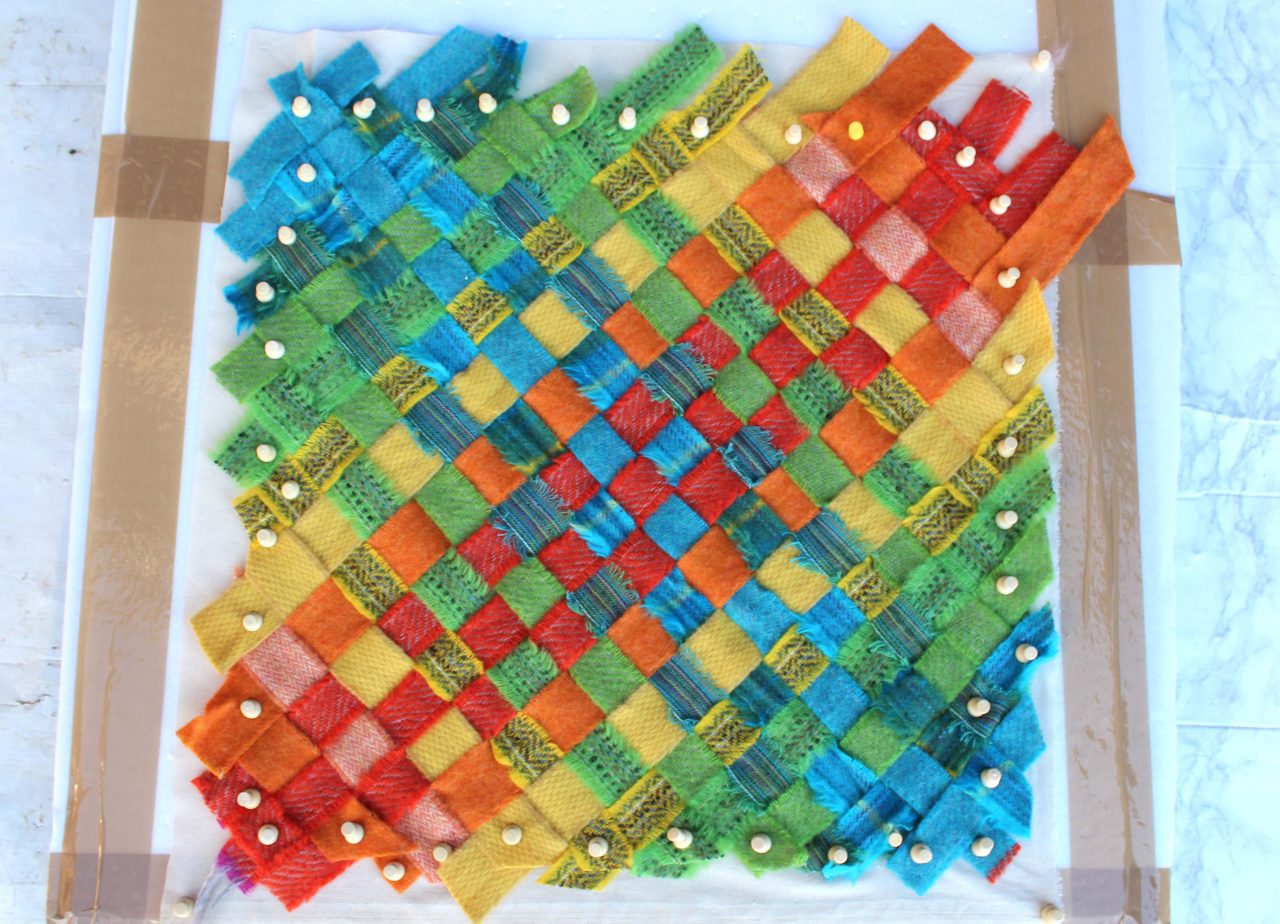
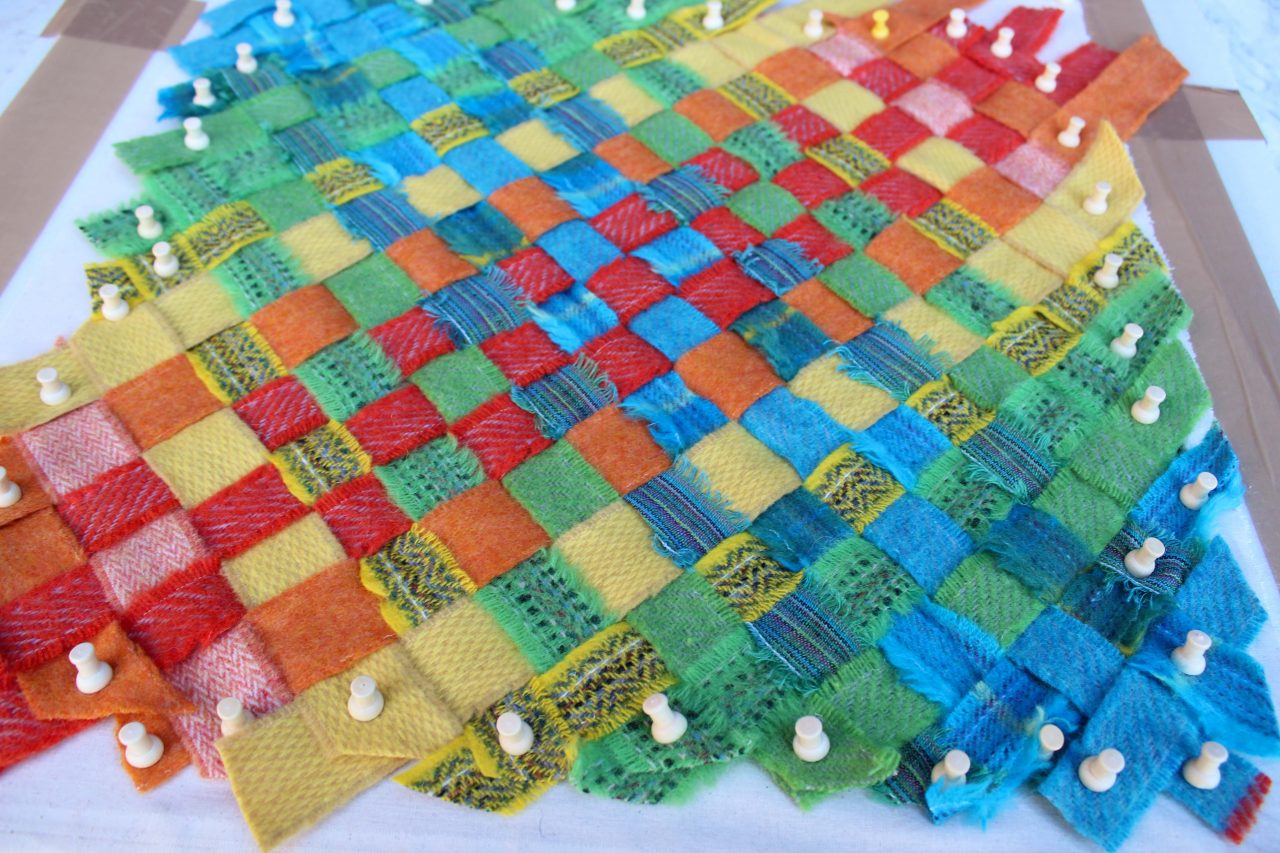
Rainbow: 10 colours 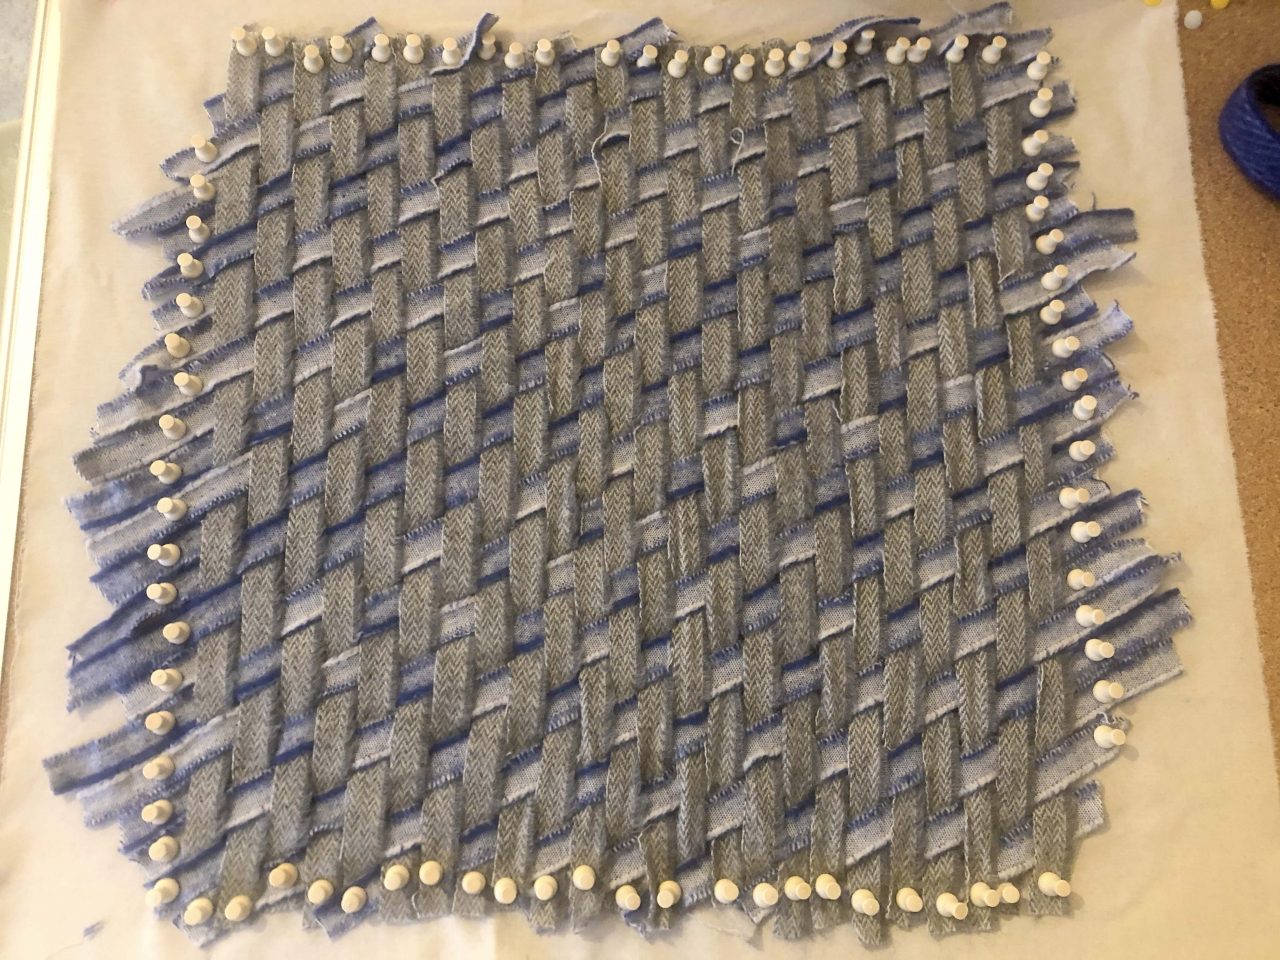
Diagonal weave: 2 colours
Diamond Weave – 2 colours
Step 2: Choose your blanket yarns
You can use as many or as few colours to ribbon weave with as you like. In this Simple Over Under design below, for example, we used offcuts from a number of different blanket yarns to create a kind of rainbow effect.
However, if you want a defined, strong pattern like a Herringbone, you should only use a limited palette, as that’s what makes the design stand out. These sorts of patterns work best with plain colours as opposed to patterned blanket yarns.
Any patterns running through the blanket yarn itself will show up within the weaving itself. We’ve discovered that blanket yarns with stitching running through them like those below look good in any design. They add interest while still giving a bold colour palette.
Ombré blanket yarns create a subtle colour transition that moves through the woven piece itself.
Tartans become a blend of the colours within the tartan itself. I’m interested to see what happens when we try a cushion entirely in tartan.
Step 3: Create your base
Once you’ve chosen your design and colour scheme, you’re onto the actual construction of the cushion itself.
We found that the best way to construct the cushions is to attach your woven blanket yarn to iron-on interfacing before assembling it into a cushion. The interfacing keeps the weaving intact when it is sewn together. However, this isn’t an absolute must, as I did make a couple of cushions before my interfacing arrived.
To prepare your base, pin your 50 x 50cm square of interfacing, adhesive (fluffier) side up, to the cork board. Draw a 40 x 40cm square onto the interfacing so you know where the blanket yarn needs to be positioned.

Make sure the sticky side of the interfacing is upwards. 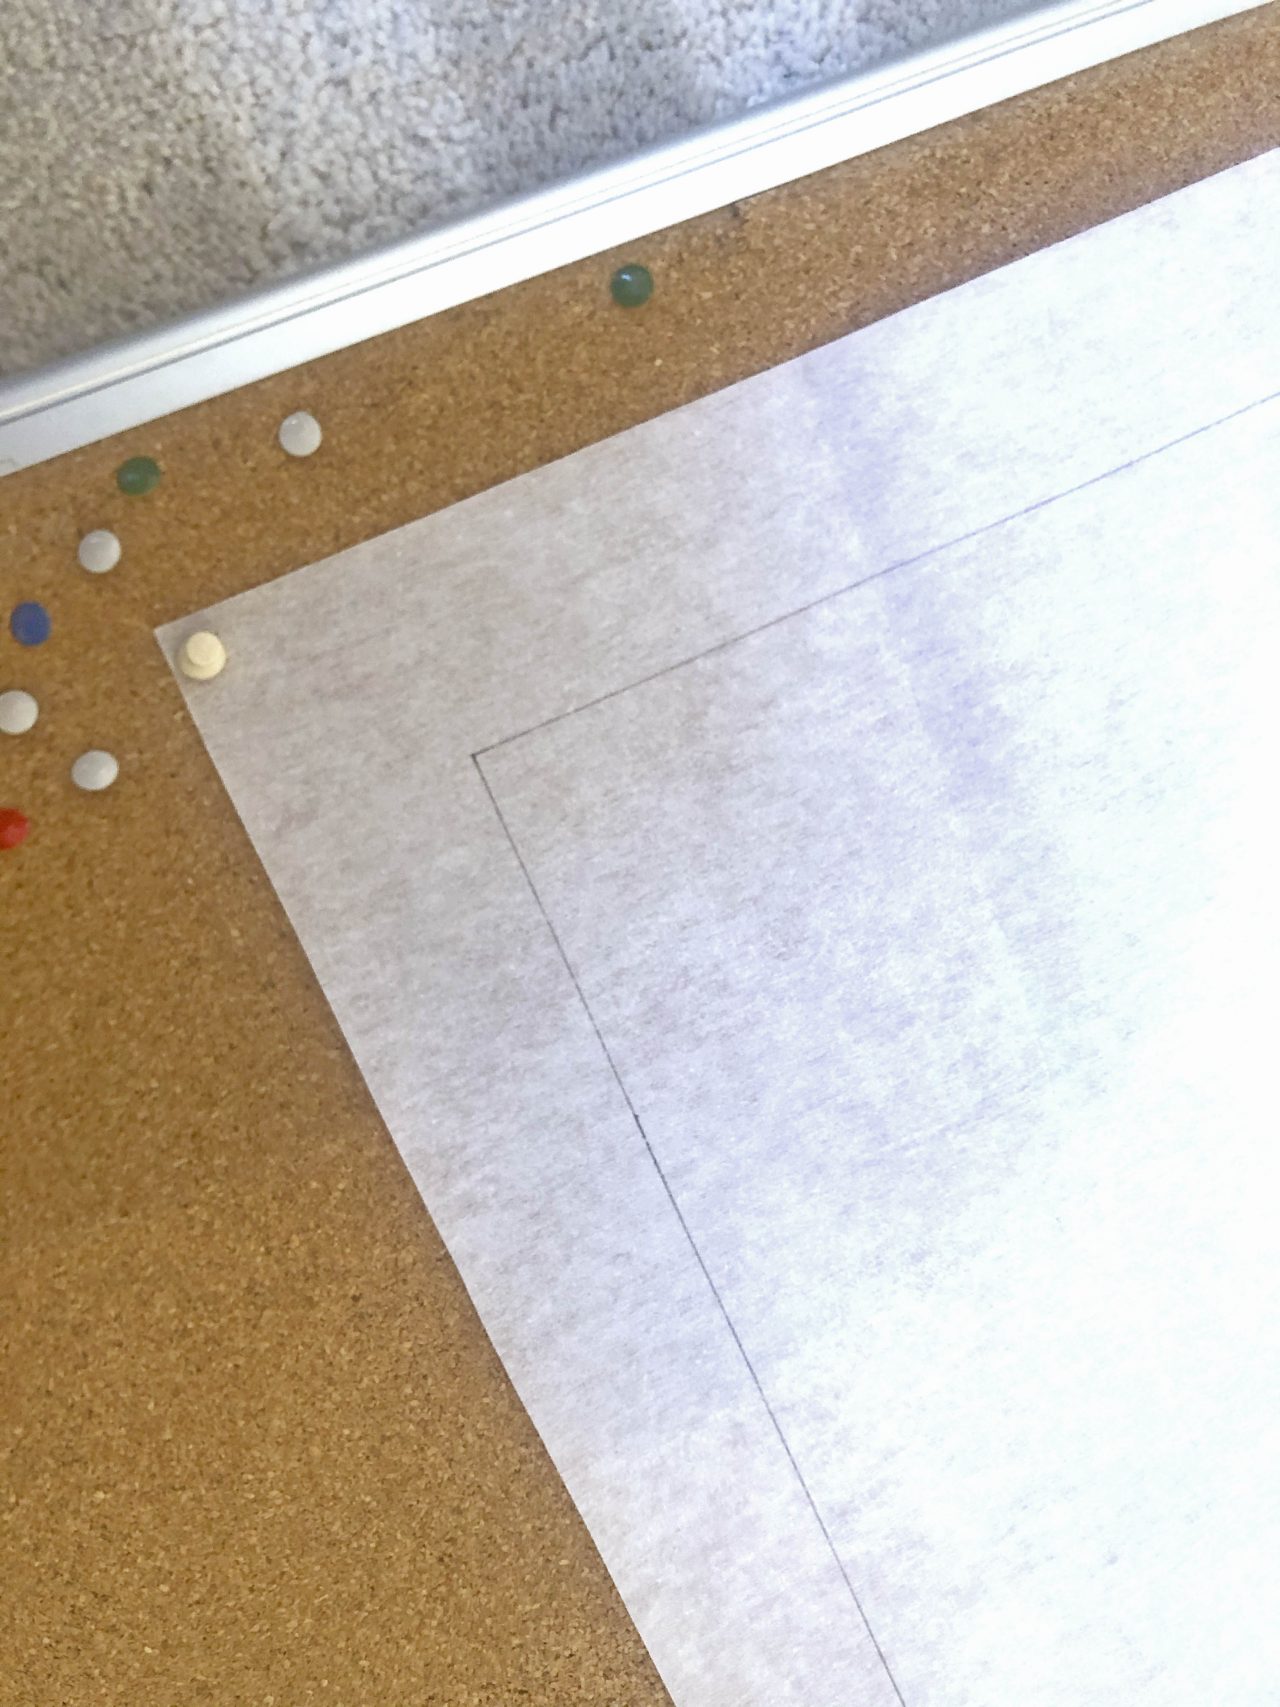
Draw a 40 x 40cm square onto the interfacing
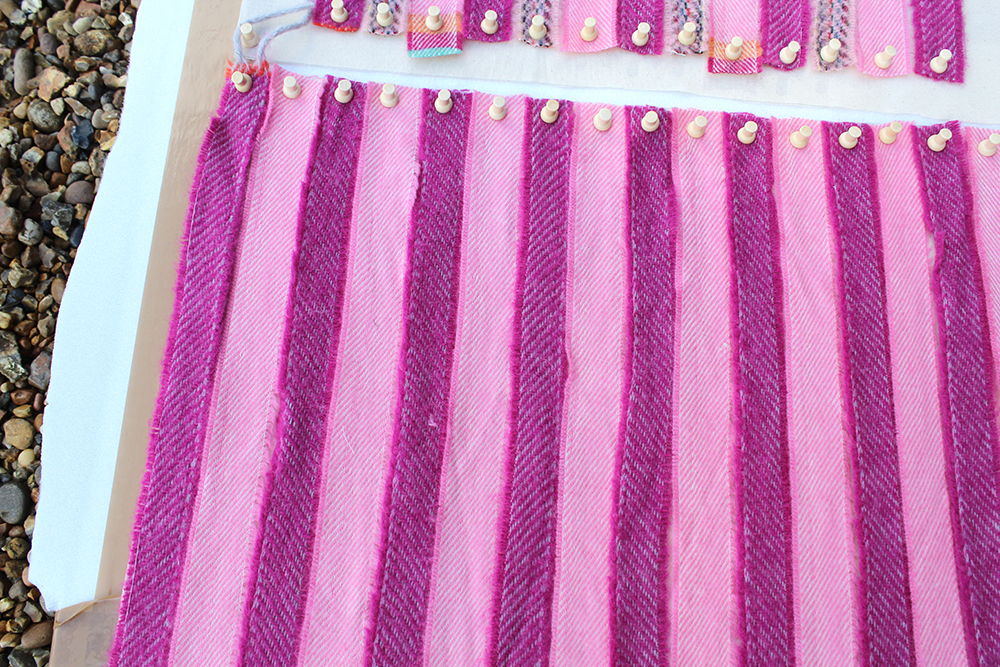
Step 4: Pin down your warp
Next, pin the warp strips onto the 50 x 50cm square of interfacing, covering the 40 x 40cm drawn square. We made sure that all our strips of blanket yarn ran slightly longer than the 40 x 40cm square, so we’d get a neat edge when assembling the cushion.
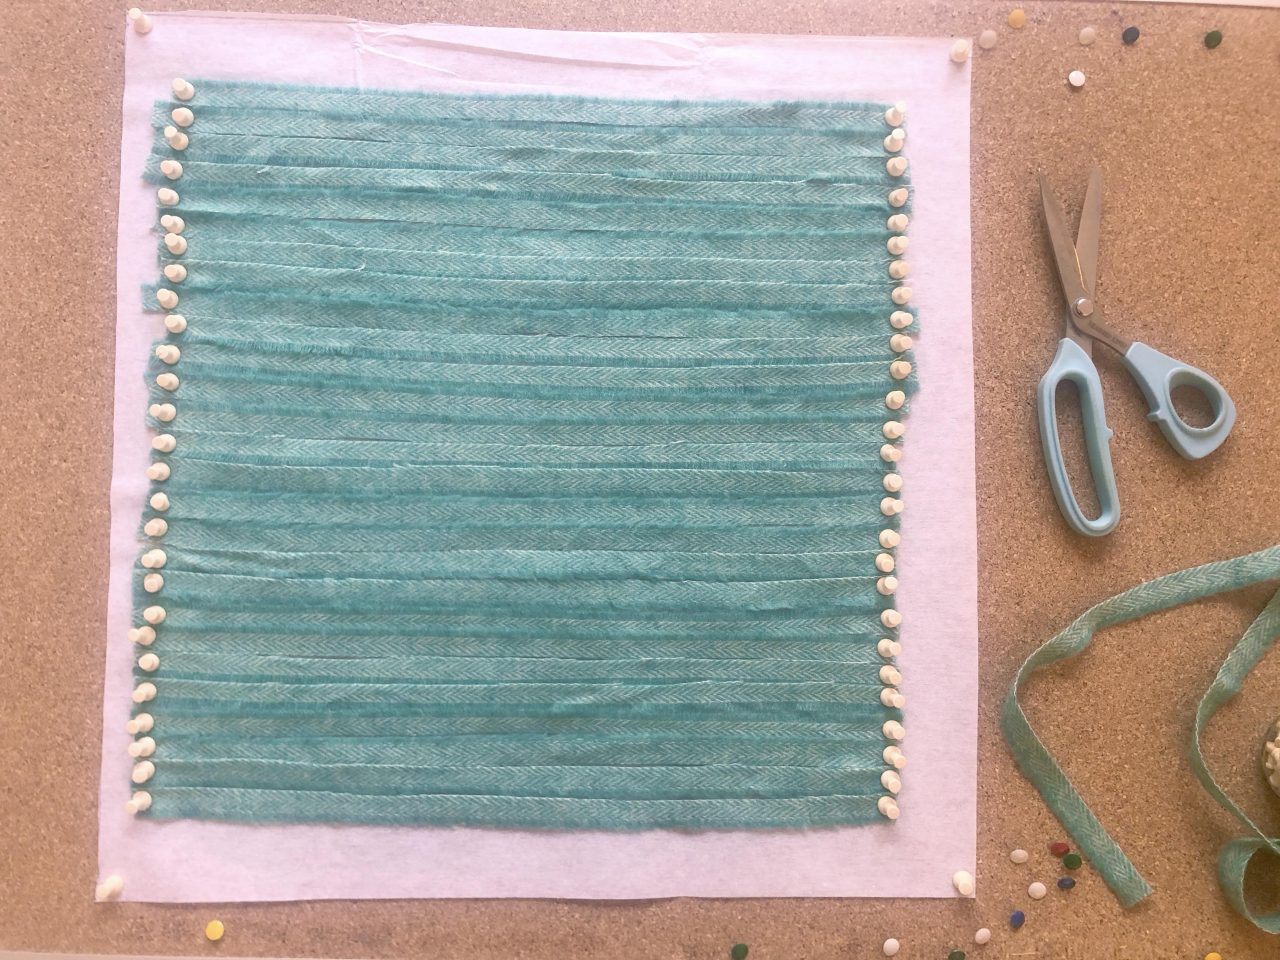
When pinning your warp strips in place, make sure that they sit snug next to each other without overlapping.
Tip: Some blanket yarn strips have one fluffy edge. When using these blanket yarns, we had the fluffy edge facing the same direction in case it impacted the overall effect later on. We’re not so sure that it did though.
Here is how we laid out our warp “threads” for the Chevron, Simple Over Under cushions and Diagonal Weave.
Chevron (above). Simple Over Under (below) 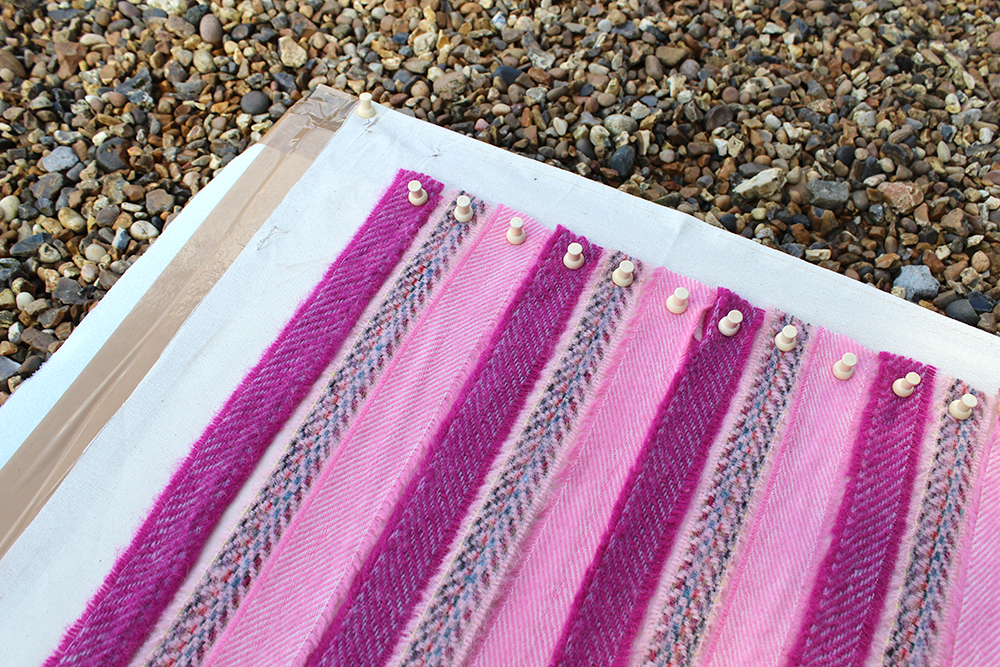
Chevron warp 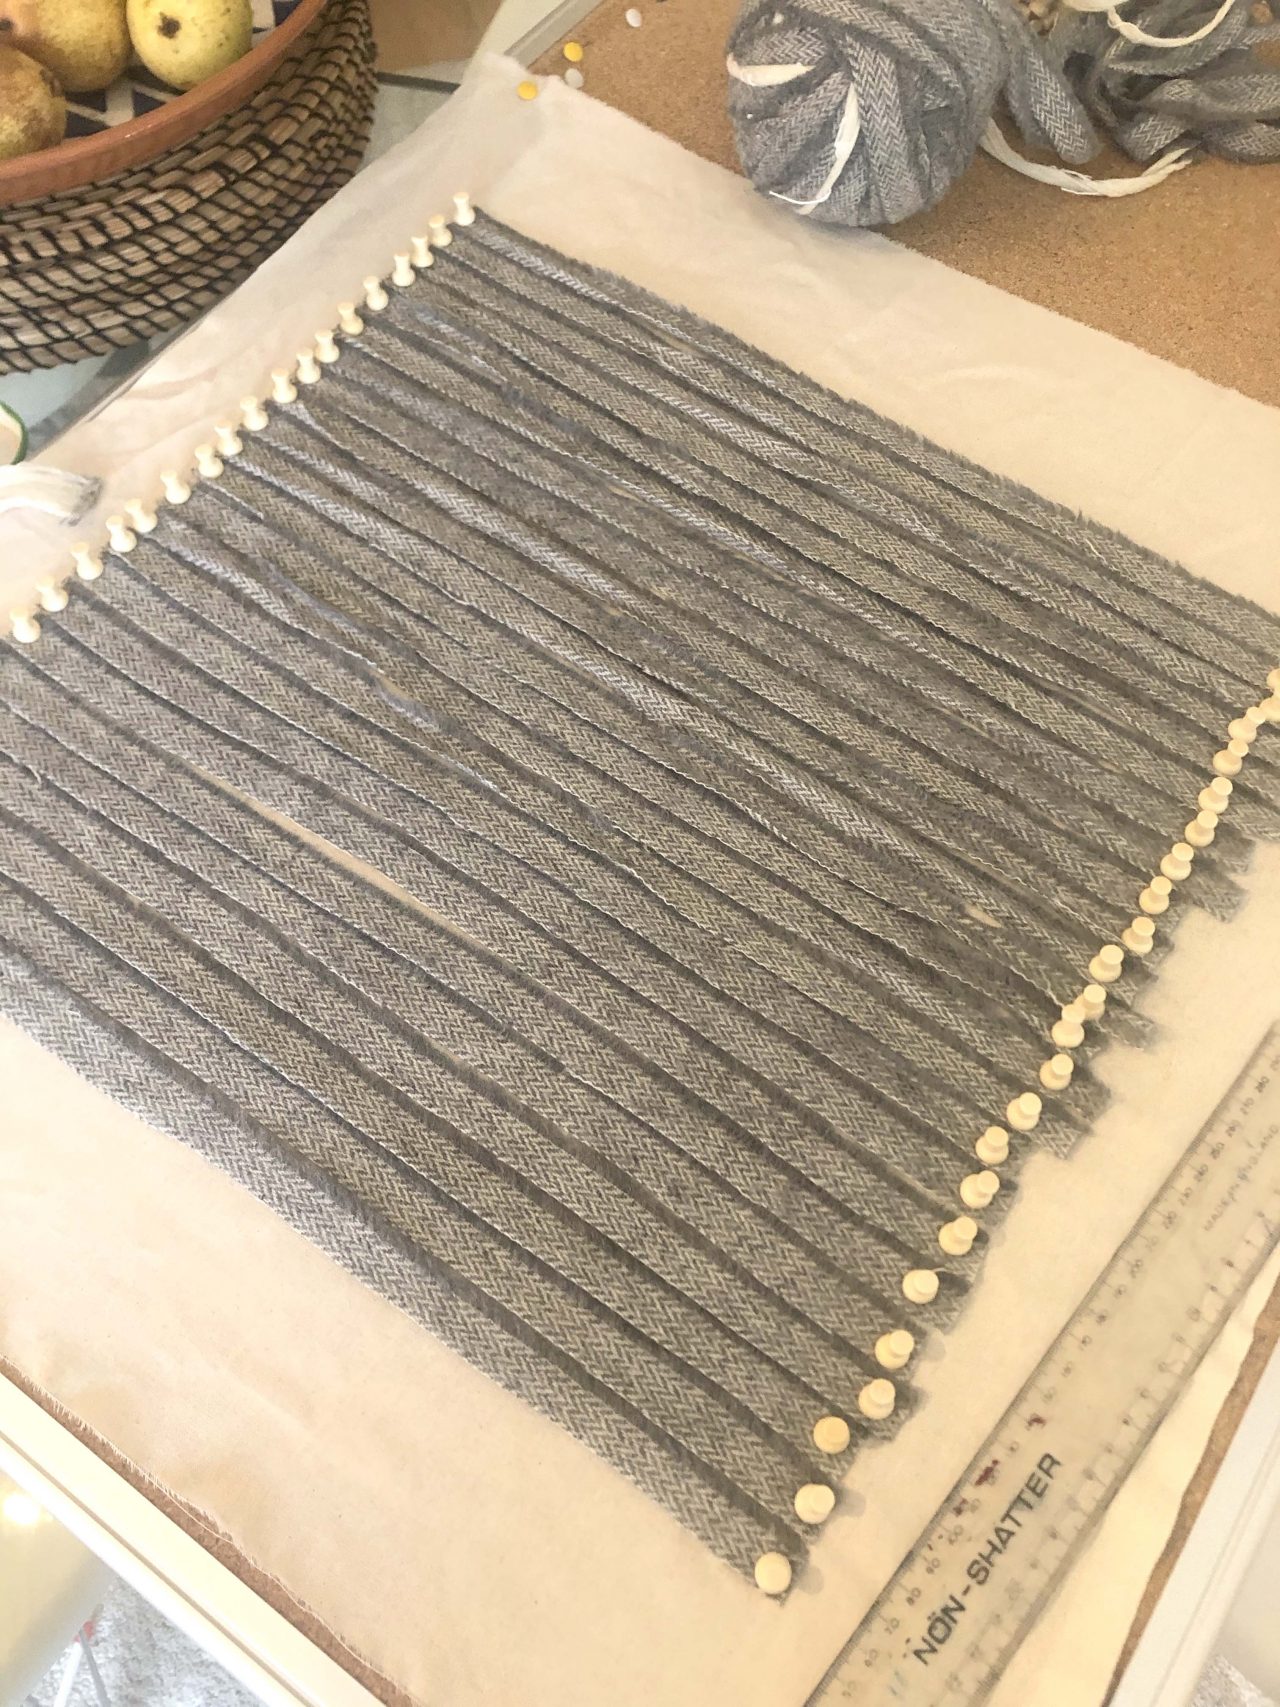
Diagonal Weave warp
NB: For the Rainbow design, we laid out out warp diagonally across the cushion, starting with the first strip in the centre of the cushion and working outwards.
Step 5: Start Weaving
Once you have set up your base and warp, you can start to weave. We’ve tried a number of different designs over the past couple of weeks, so you can follow along with some of our patterns below.
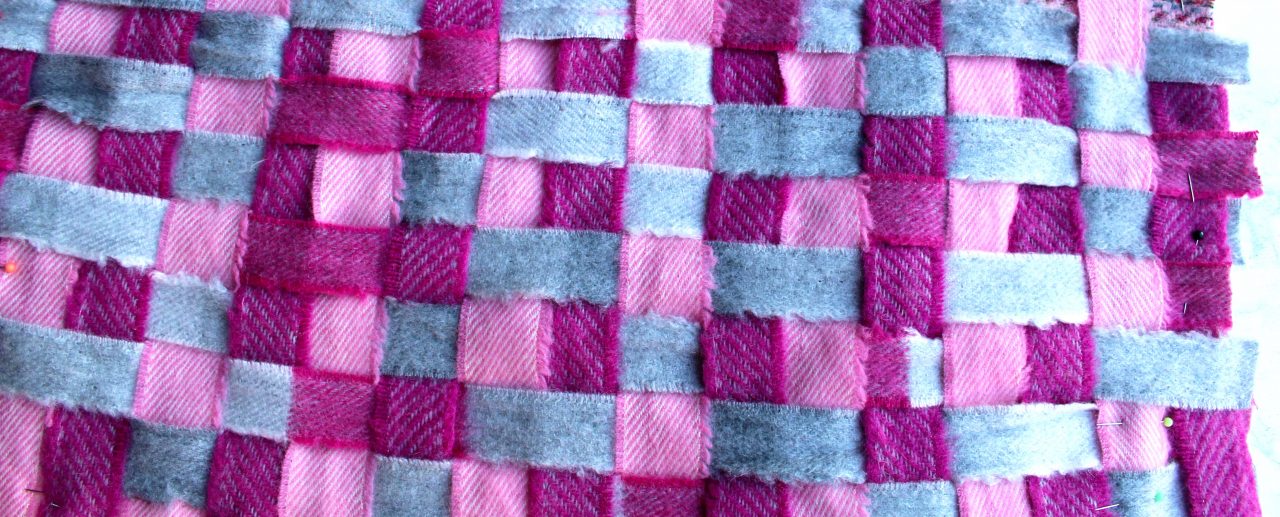
Simple Over Under Design:
The Simple Over Under Design is the easiest of all the ribbon weaving patterns, so it’s a nice one to start off with. Start in the top left corner of the square and weave each strip of blanket yarn across the warp in the below sequence:
Row 1: Over, under, over, under, over, under, over, under etc… Continue until you reach the other side of the cushion.
Row 2: Reverse your pattern. Begin in the top left corner just below your first strip and weave: Under, over, under, over, under, over, under, over etc… until you reach the other side of the cushion.
Repeat rows 1 and 2 until you reach the bottom of the cushion.
Design Variations:
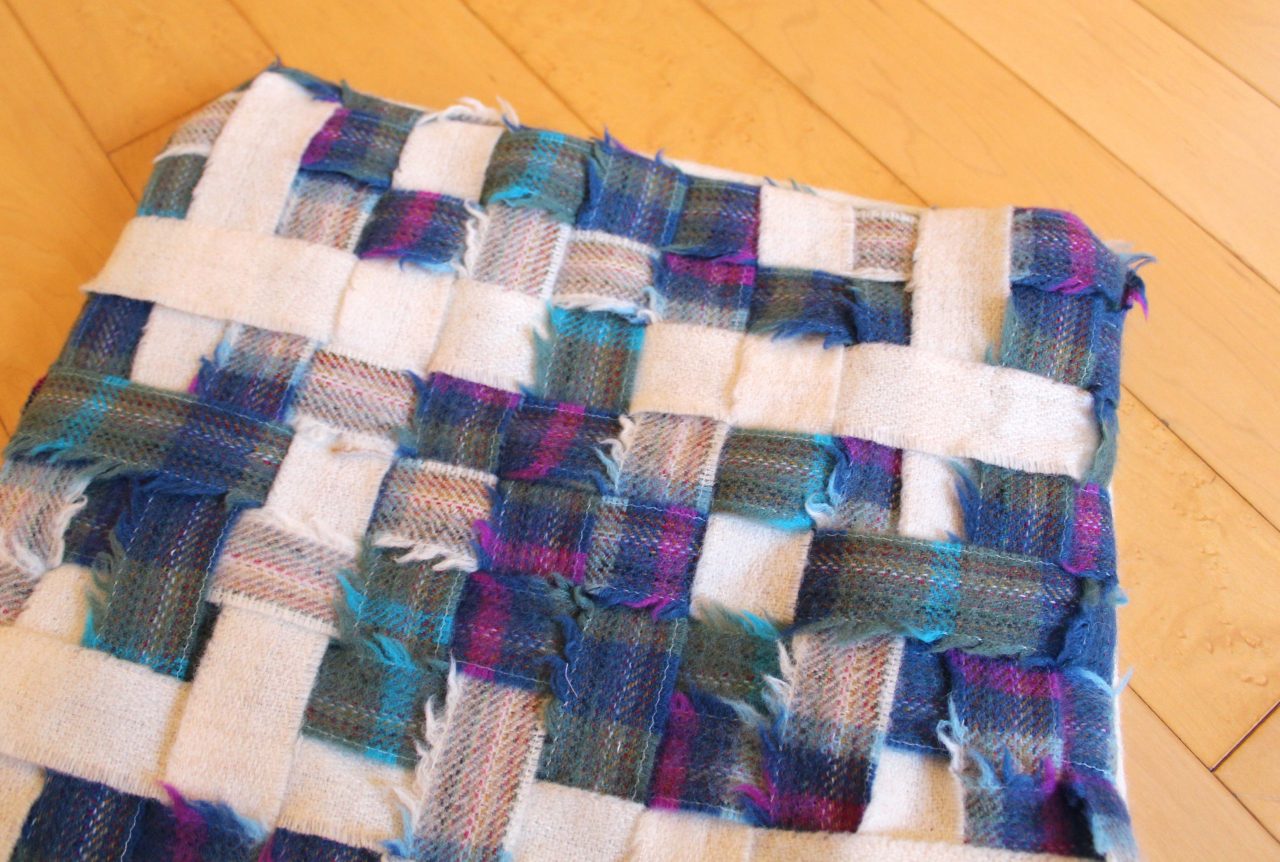
In the below design, we used two colours for the warp, and one for the weave. This meant the weave fabric (the light pink with stitching in) stood out very strongly. So, it sounds like common sense, but if you want a blanket yarn to stand out well, use more of it.
Half way through the cushion, we experimented with what would happen if we began to miss out a couple of warp threads at a time. We started weaving
Row 1: Over, under under, over, under under, over, under under etc…
Row 2: We then reversed the pattern, so: Under, over over, under, over over, under, over over etc… Below is what that looked like:
We quite liked the effect, but realised missing out multiple warp strands made the weave less compact, and maybe less practical in the long run. If we had cut the strips in half lengthways, it would have made the design more compact and maybe more effective. We still thought it looked good though.
To vary the Simple Over Under Design, why not experiment with laying the warp out diagonally and weaving diagonally. That’s what we did in this Rainbow design, starting in the centre and working our way out.
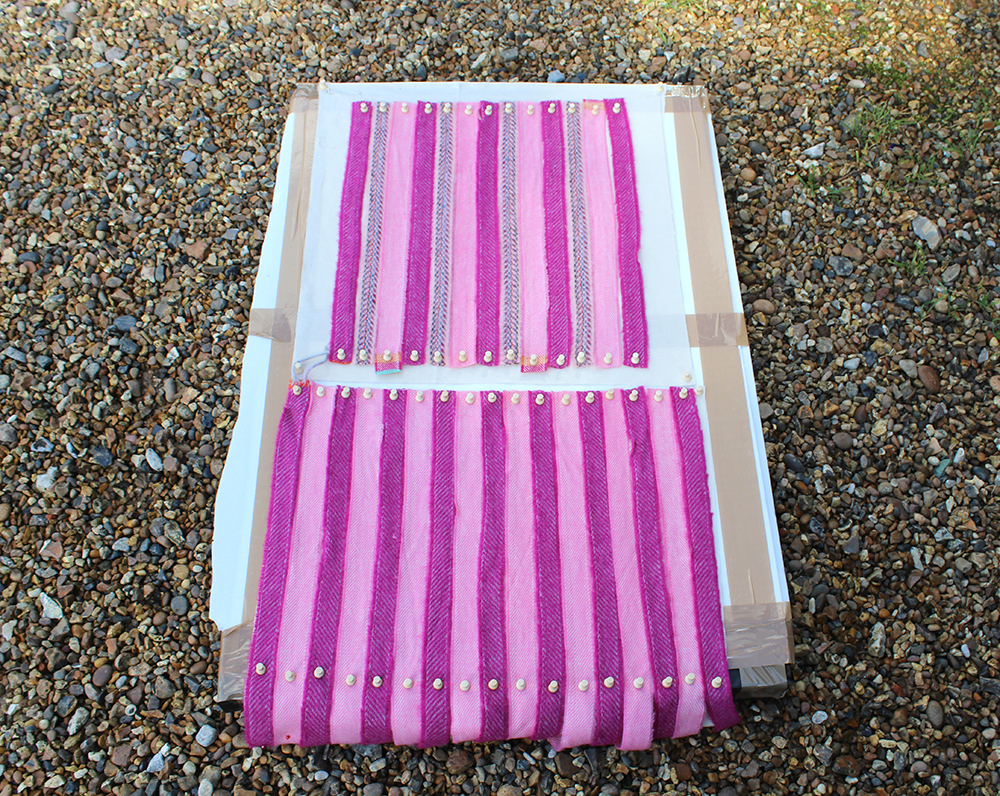
Herringbone Design:
The herringbone design of weaving took a good bit of brainwork from Sany. She started out by cutting her blanket yarn strips in half lengthways to create a more intricate pattern. She laid out the warp strips at an approx 30 degree diagonal angle across the cushion, alternating blue then yellow, blue then yellow.
She wove at a 30 degree angle in the below sequence…
Row 1: Under under, over over, under under, over over, under under etc..
Row 2: Under, over over, under under, over over, under under, over over etc…
Row 3: Over over, under under, over over, under under, over over etc…
Row 4: Over, under under, over over, under under, over over, under under etc…
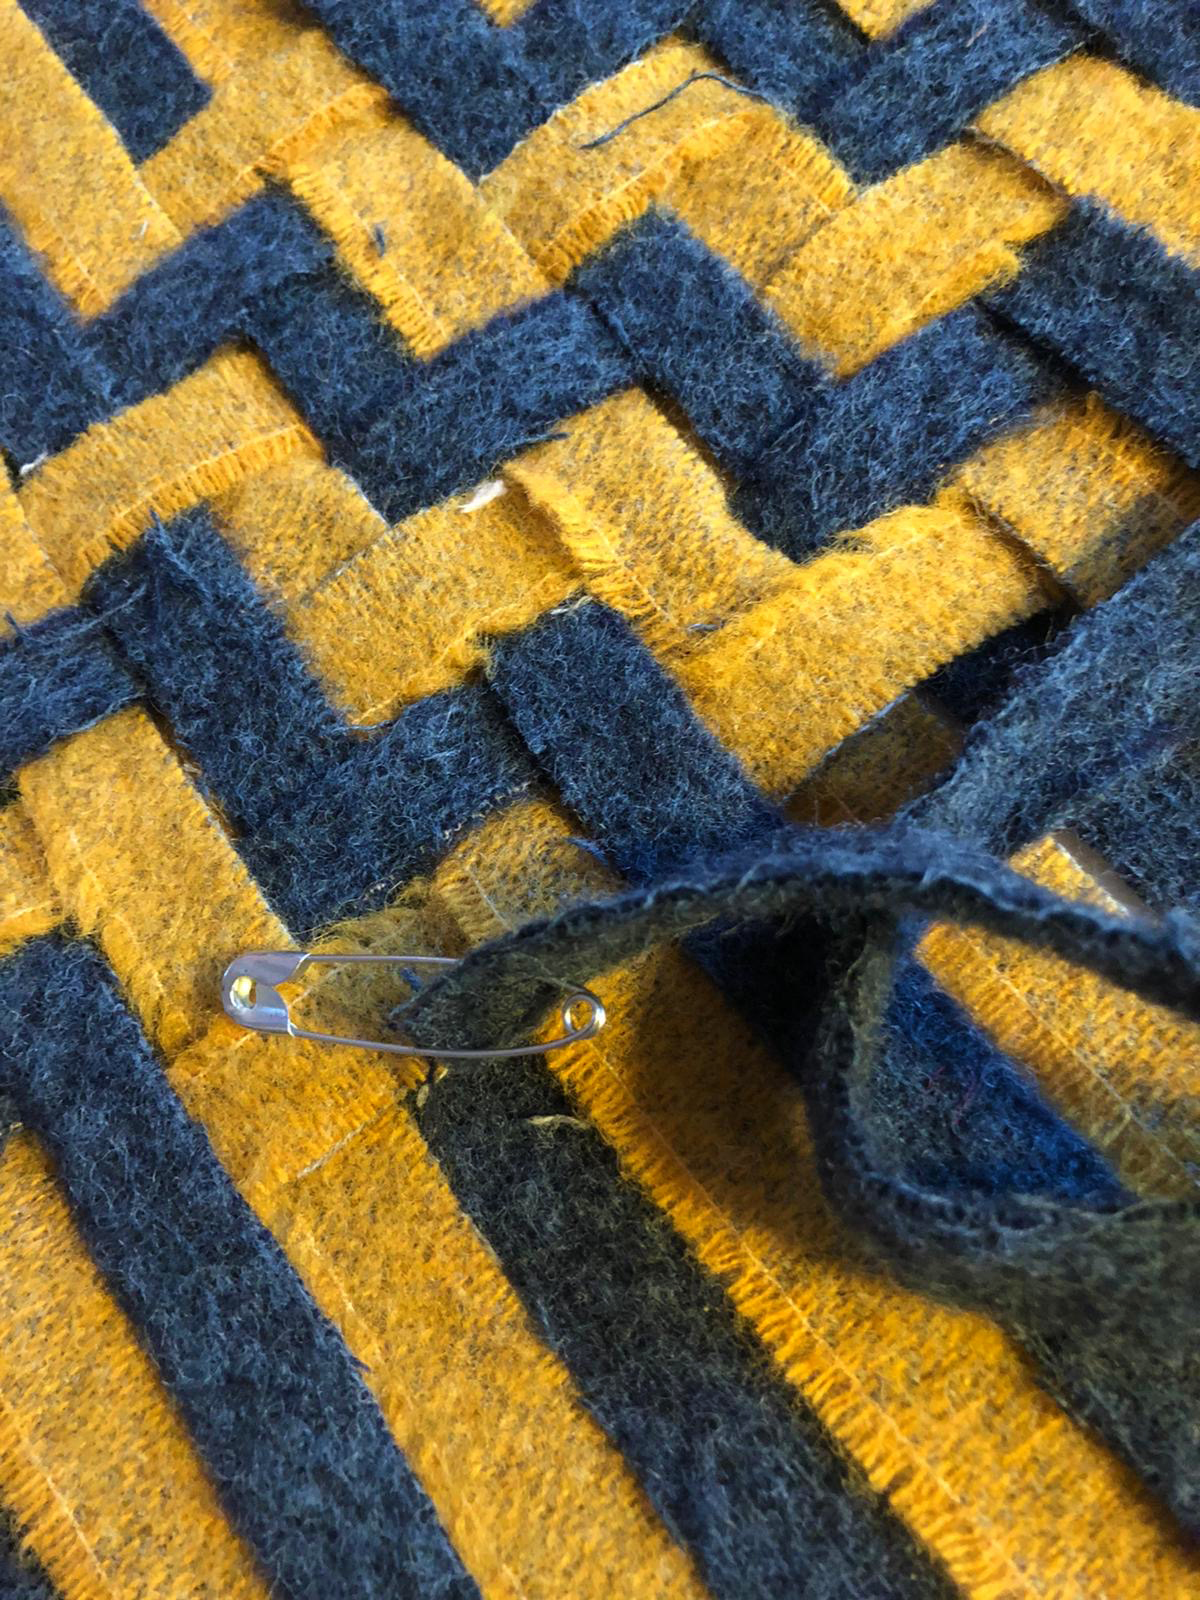
She continued this pattern across the whole cushion until the herringbone pattern became clear. Sany actually found it easier to use a safety pin to help pass the strips of blanket yarn through the warp. Below is how it progressed from warp to weave.

Chevron Design:
We created our chevron design using three different colours. We started off by pinning down the warp, alternating the colours from left to right. Starting in the top left corner, we then began weaving this sequence from left to right:
Row 1: Under, over over, under under, over over, under under etc…
Row 2: Under under, over over, under under, over over etc…
Row 3: Over, under under, over over, under under, over over etc…
Row 4: Over over, under under, over over, under under, over over etc…
We then repeated this 4 row pattern across the cushion to create this look:
You can play around with this design by cutting your strips narrower to create a less chunky pattern. We particularly liked the blanket yarn with stitching in for this look.
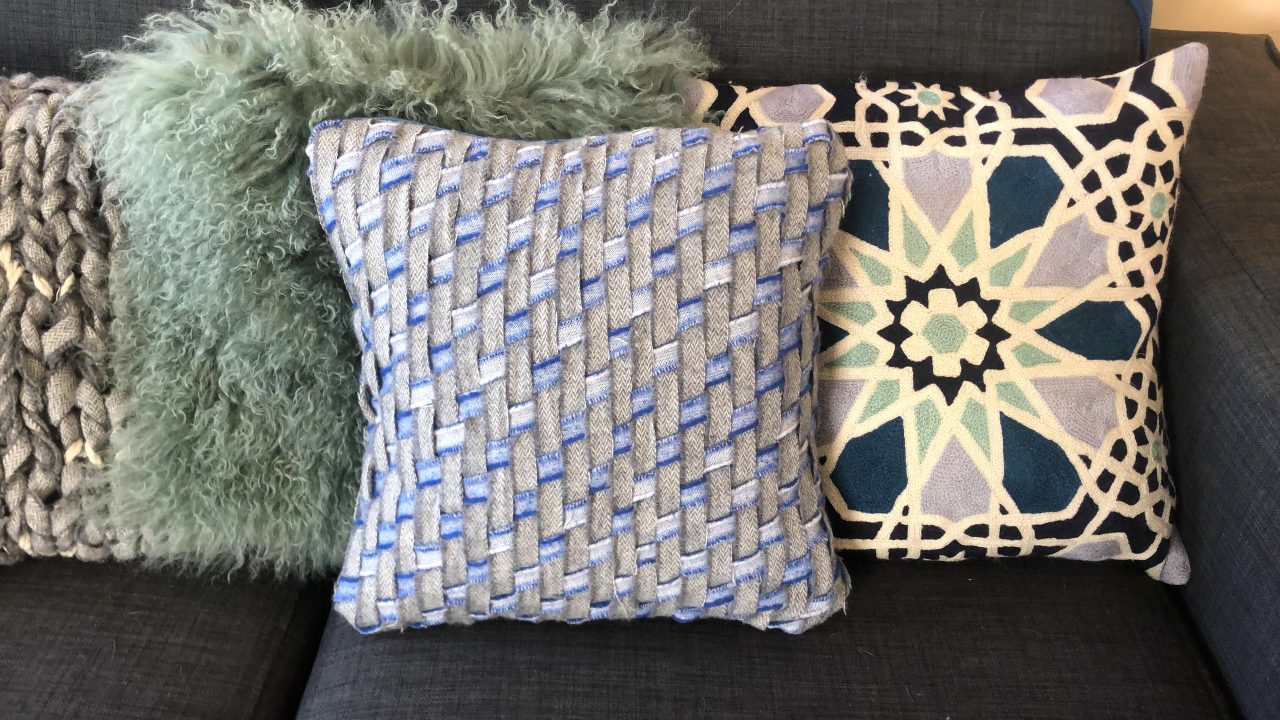
Diagonal Weave:
Whilst trying to re-create Rami Kim’s complicated cube design from earlier in the post, I ended up making this quite simple, but effective diagonal weave design. I was quite pleased by how it looked, so decided to just leave it as is.
I started off by laying out an entirely grey warp. Then, starting in the top left corner, I wove at a 30 degree angle in this sequence from left to right:
Row 1: Over, under under, over, under under, over, under under etc…
Row 2: Directly above the first strip: under, over, under under, over, under under, over, under under, over etc…
Row 3: Directly above the second strip: over, under under, over, under under, over, under under etc…
Repeat this sequence of three strips across the whole cushion and it will build up like below…

Step 1 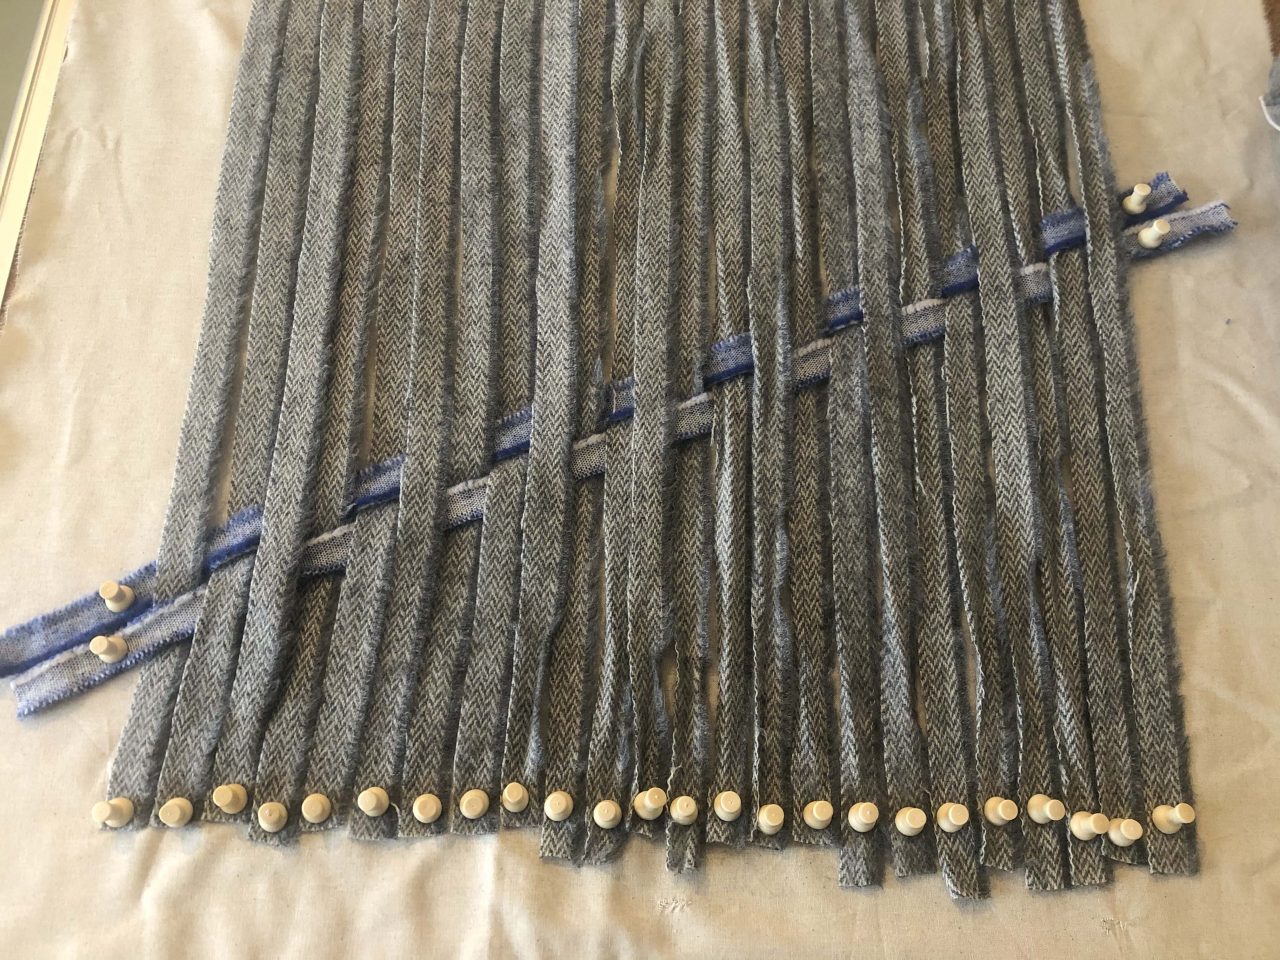
Step 2 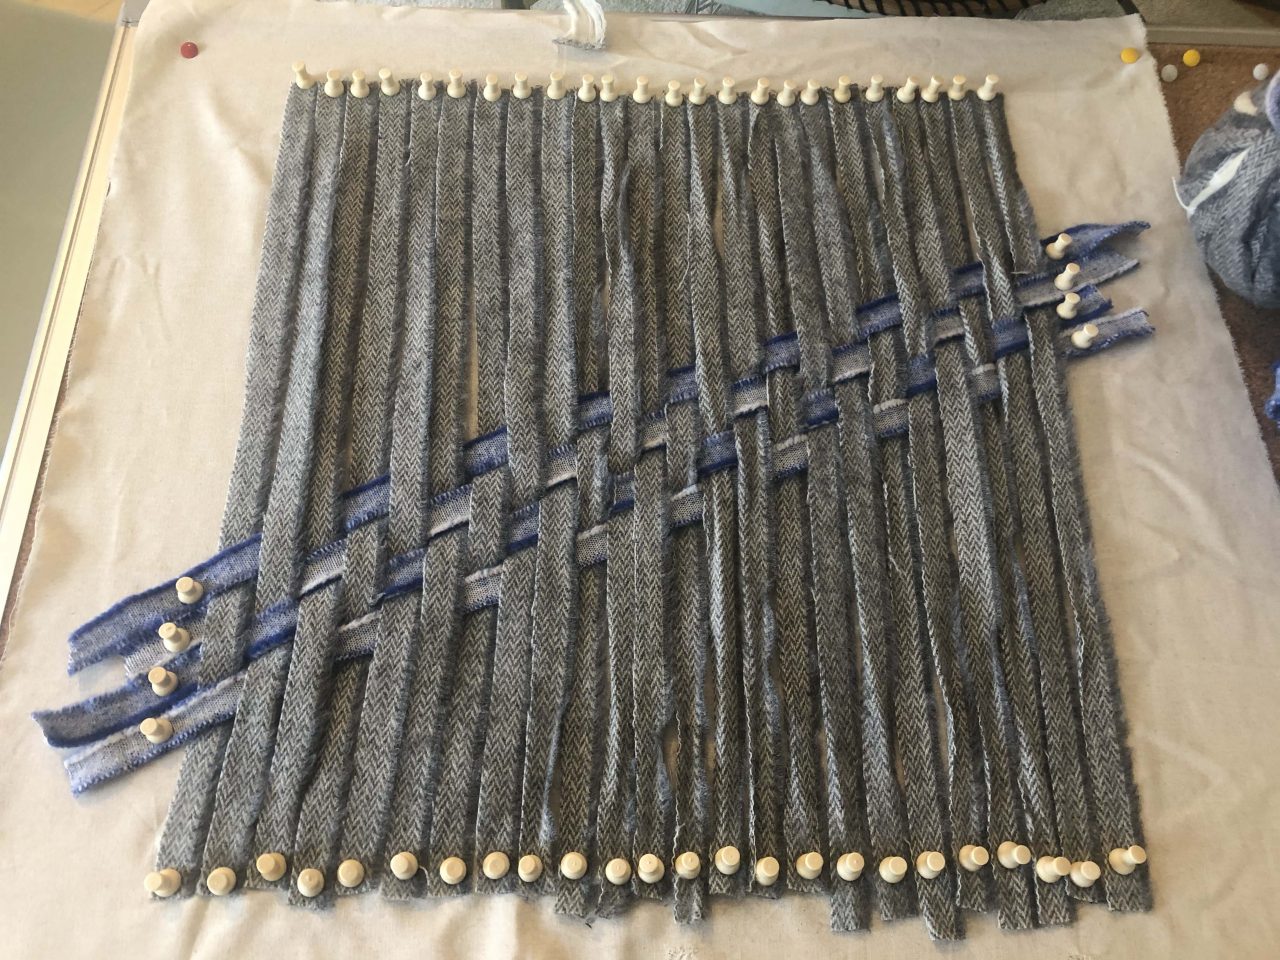
Step 3 Finished Diagonal Weave
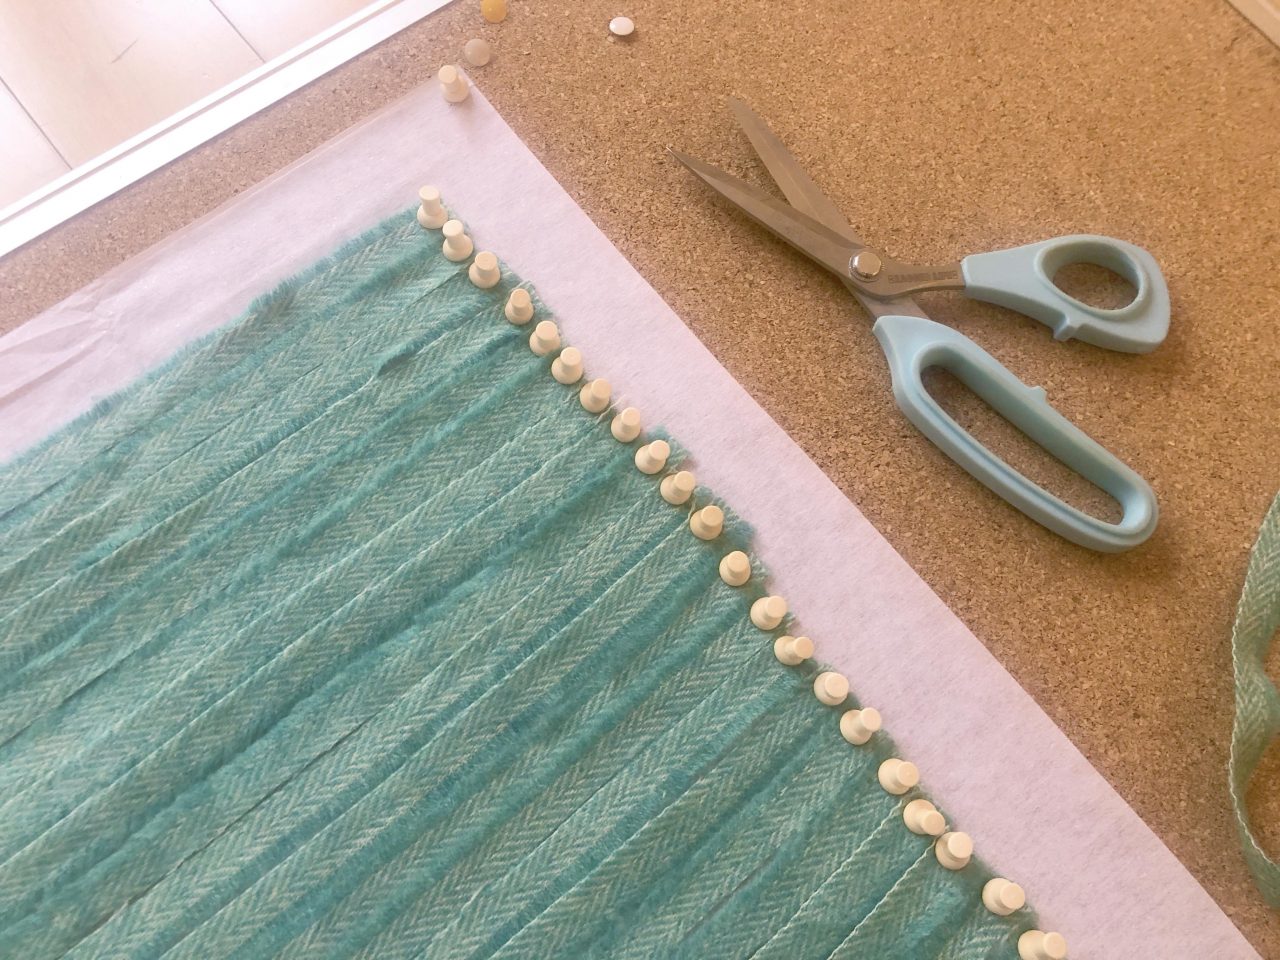
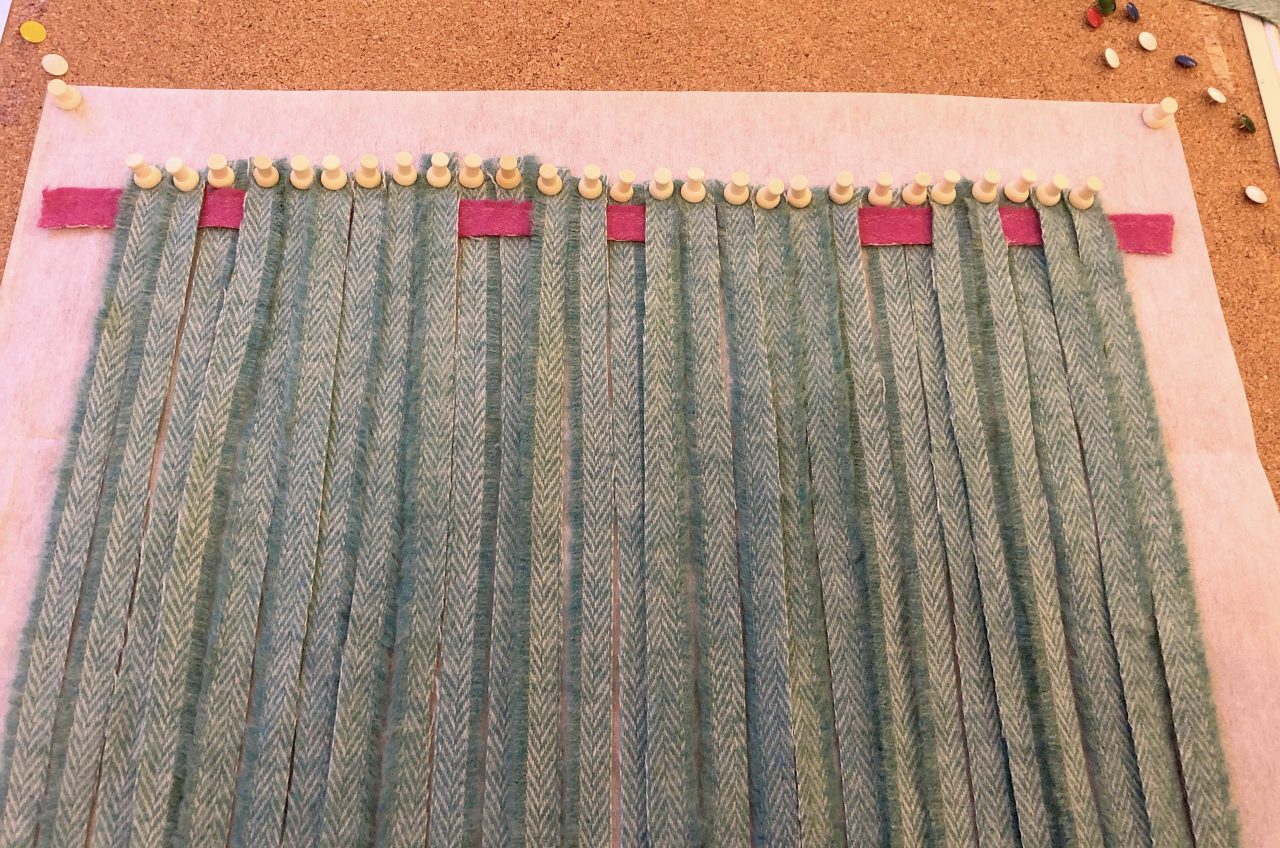
Diamond Weave:
Part way through all this experimentation, I realised that ribbon weaving ideas can sometimes be found under the title “meshwork” online, which is how I found the below pattern. For this design to work, you need 27 warp strands. To make a 40 x 40cm cushion, each warp strand needed to be approx 1.5cm wide. I started by pinning down an entirely jade warp to the interfacing on the cork board….
Starting in the top left corner (with the warp vertical), I wove in this sequence from left to right
Row 1: Under under, over, under under under under under under, over over, under under, over, under under under under under under, over over, under under, over, under under.
Row 2: Under, over over over, under under under under, over over, under under, over over over, under under under under, over over, under under, over over over, under
Row 3: Over over, under, over over, under under, over over, under under, over over, under, over over, under under, over over, under under, over over, under, over over
Row 4: Under, over over over, under under, over over, under under under under, over over over, under under, over over, under under, over, under under under, over, under under
Row 5: Under under, over, under under, over over, under under, over, under under under, over, under under, over over, under under, over, under under under, over, under under.
Row 6: Under under under under, over over, under under, over over over, under under under under, over over, under under, over over over, under under under under
After about 6 rows you will begin to see the pattern developing and know where to weave. Continue the design to the bottom of the warp. I used the front and back of the pink strips of blanket yarn to add interest to the design.


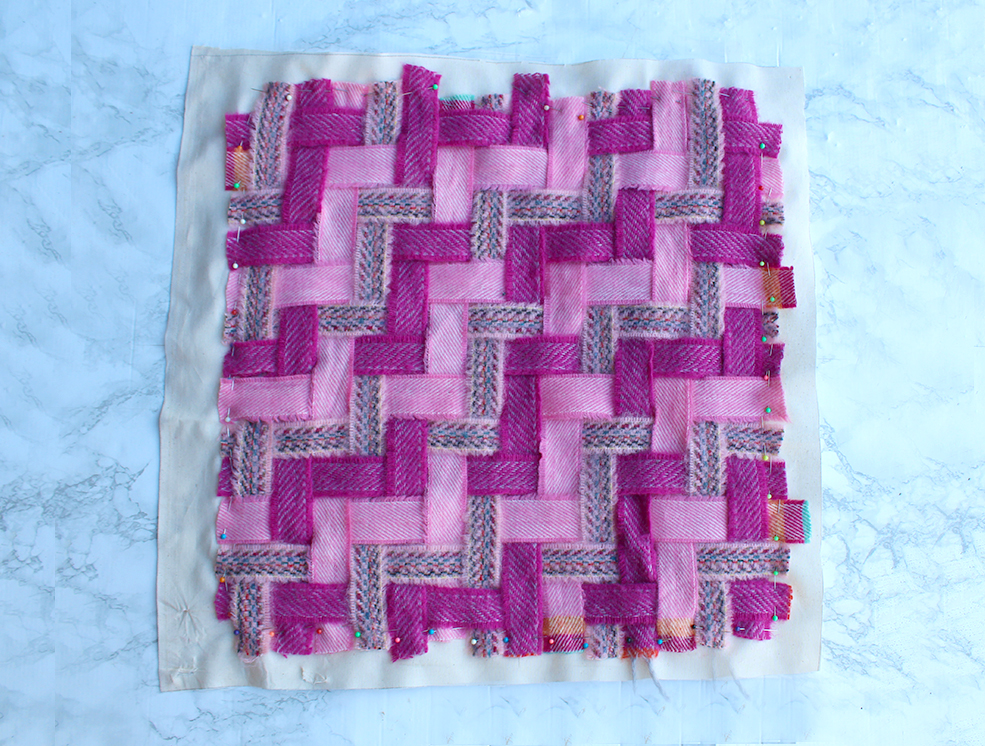
Step 6: Assemble your cushion
Once you are happy with how the weaving looks, carefully remove he drawing pins and iron the strips of blanket yarn to the interfacing using a bit of steam. This helps to keep the strips somewhat secure when you stitch together the cushion. I ironed the strips to the interfacing directly on the cork board (which didn’t seem to do it any harm) and took out each row of drawing pins one edge at a time.

Next, place the square of interfacing (with blanket yarn attached) on top of a piece 50 x 50cm lining fabric. I used a piece of thin cotton.
Prepare the backing fabrics. I used thick cotton to back some of the cushions. As cotton frays when cut, I hemmed one 50cm edge of each piece of 35 x 50cm backing fabric (by folding the edge over twice and stitching it in place). However, I also used a blanket backing for some cushions. These did not need hemming as they had a selvedge edge.
Whatever backing fabric you choose, place the first piece of backing fabric right side down on top of the woven cushion front with the hemmed or selvedge edge towards the centre of the cushion, rough hemming facing up.
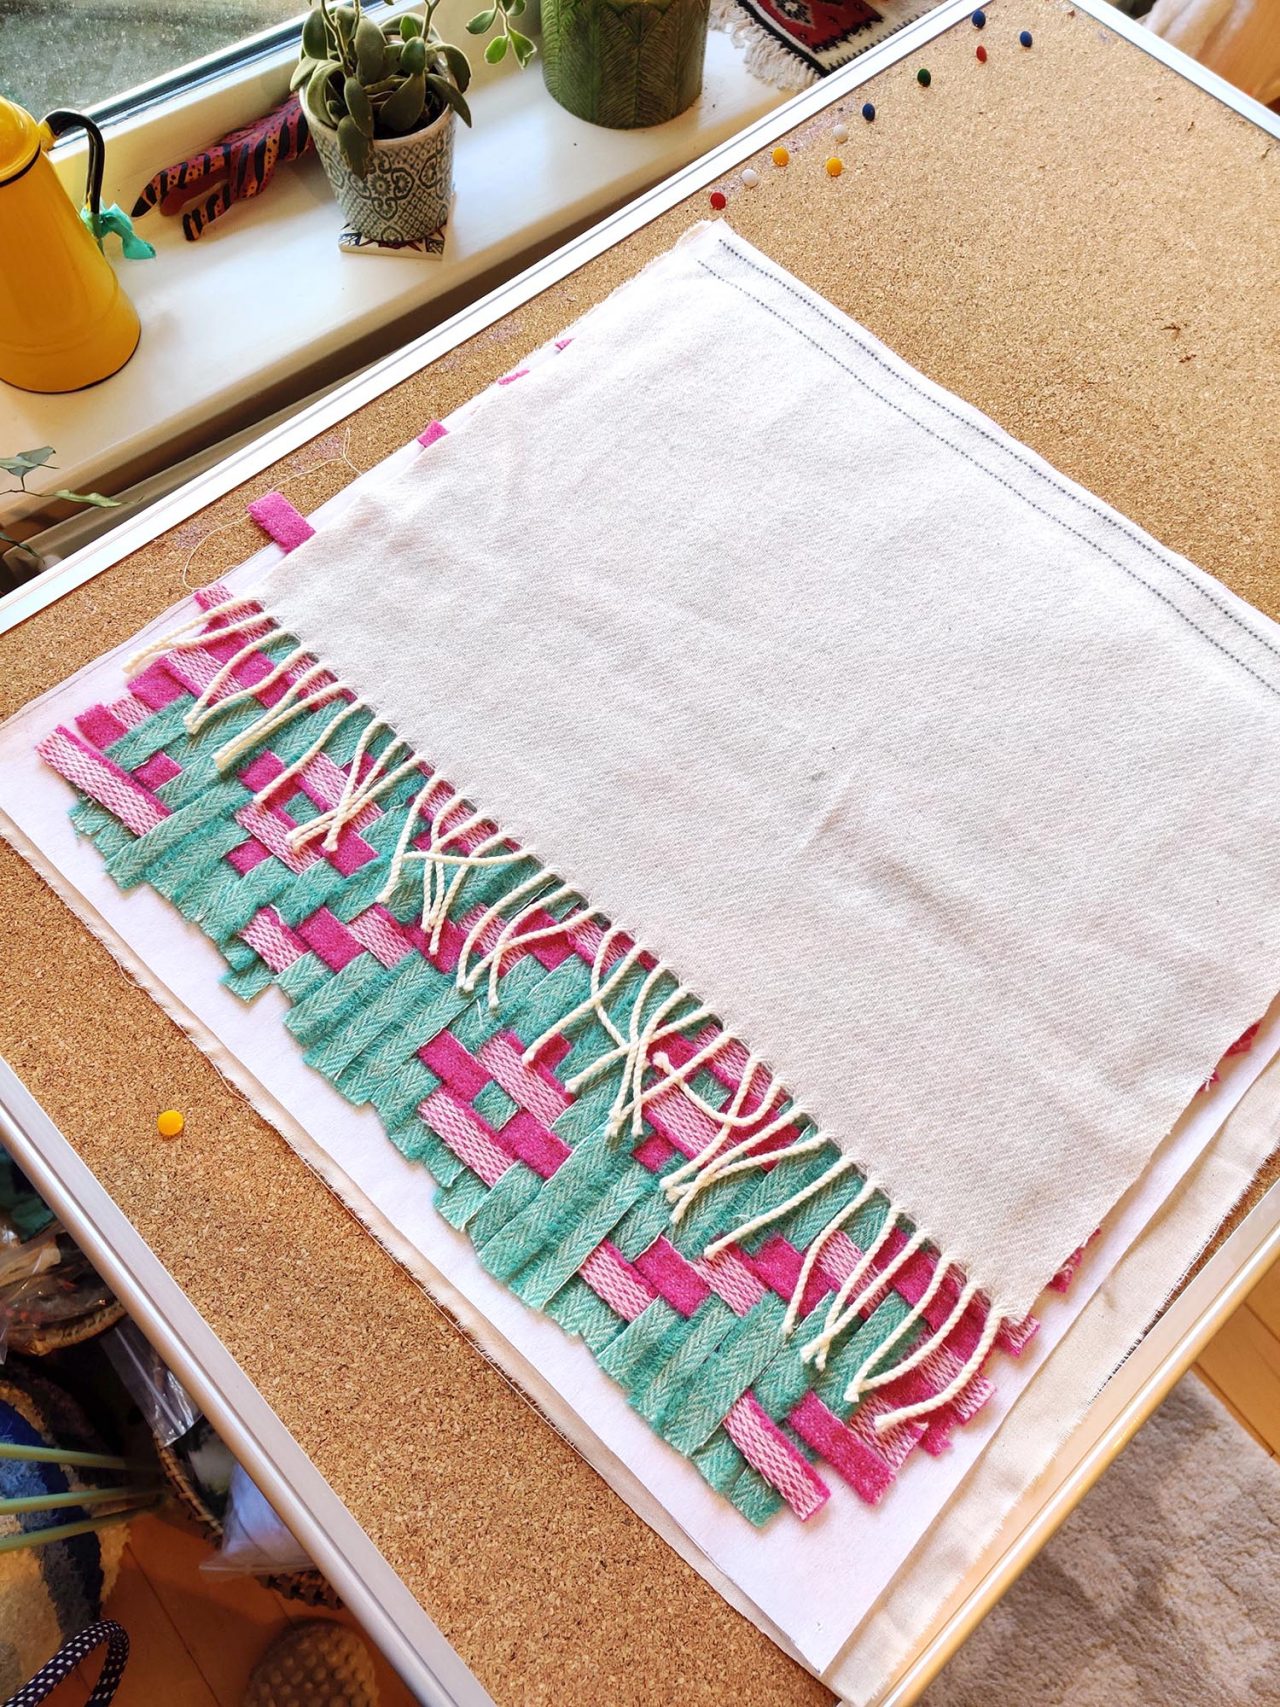
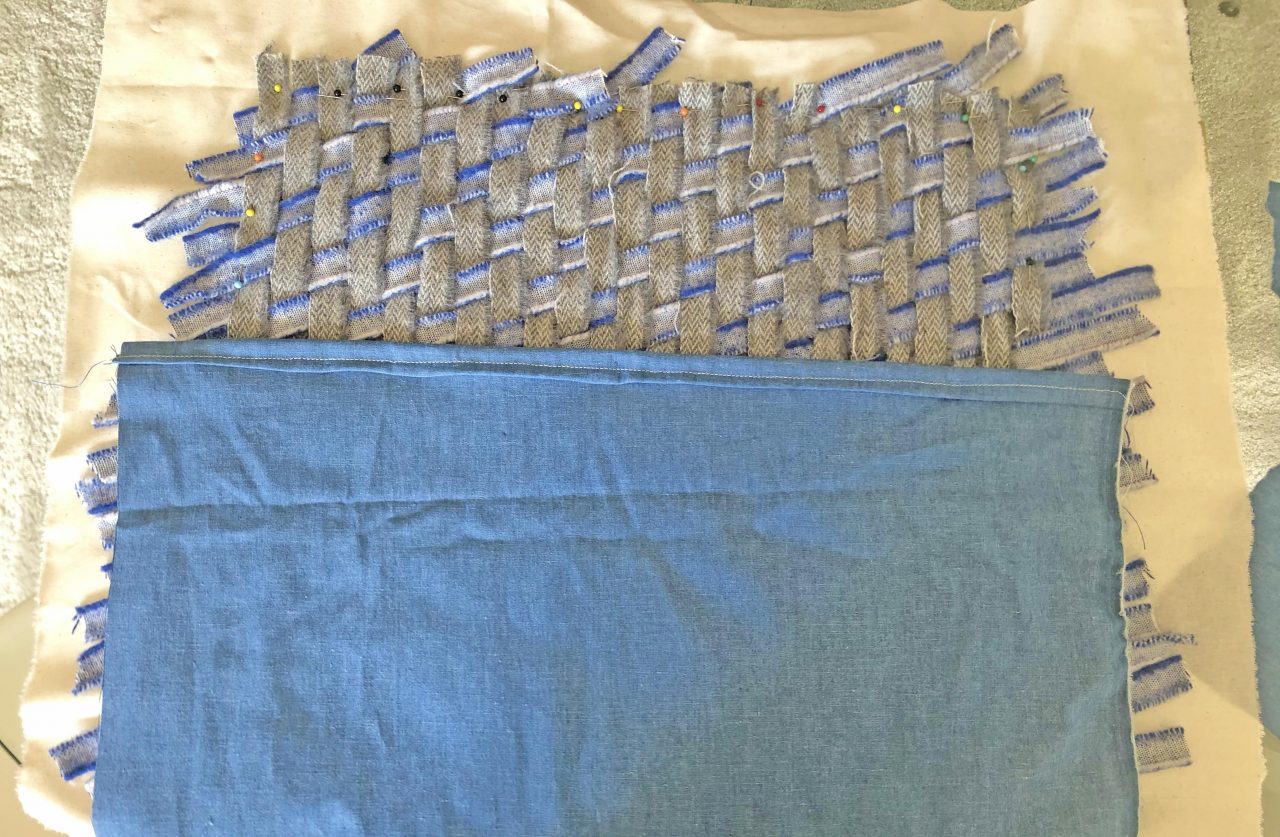
Place the second piece of backing fabric right side down on the top of the first piece, so they are overlapping. Once again, the hemmed edge should be towards the centre of the cushion.
Pin the pieces of backing fabric to the woven cushion front, making sure to pin through all the layers – blanket yarn, interfacing and lining fabric.
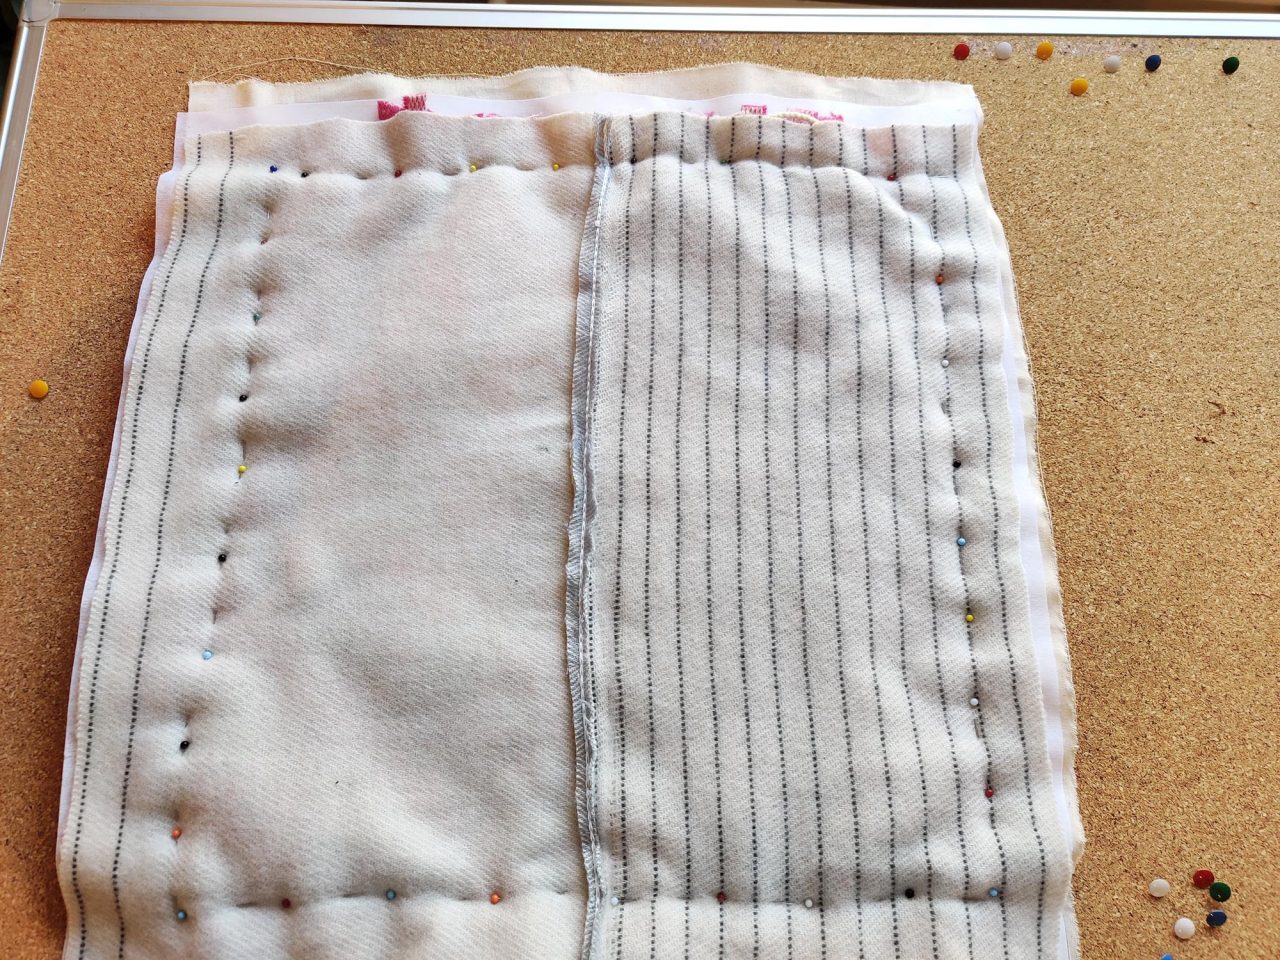

Stitch around the square. Trim off the excess fabric around the stitching, leaving approx 2cm of fabric. Turn the cushion inside out and, hey presto, one woven blanket yarn cushion! Or maybe half a dozen 🙂
In Conclusion:
So that was a very brief intro to woven rag rug cushions. We’ll be looking to put in a couple of workshops in Hertfordshire for later in the year, so email us at hello@raggedlife.com if you’d like to be informed when these go live. You’ll be let loose on our full range of 100% wool blanket yarns!
If you can’t wait to get going while you’re in isolation then we’ll also be trialling a ribbon weaving online workshop, so head over to the Ragged Life workshops page to get booked in.
Thanks for reading and, as usual, if you’d like to be kept informed then why not join our Rag Rug Community on Facebook, follow us on Instagram or join our fortnightly newsletter here. Or, to learn a bit more about your blanket yarn then check out our blog post, here.
OR CONNECT WITH US ON SOCIAL MEDIA AT:
Instagram: https://www.instagram.com/raggedlife/
Facebook: https://www.facebook.com/raggedliferagrugs/
Pinterest: https://www.pinterest.co.uk/raggedlife/
Twitter: https://twitter.com/raggedlife
Elspeth x
[…] making (shaggy, short shaggy and loopy), as well as peg loom weaving, locker hooking, twining and ribbon weaving. Other clever crafters even use it for extreme knitting, crochet, edging and much more. The only […]
[…] with anyone who loves making. You can crochet, knit or even weave with them. I even had a go with ribbon weaving with it earlier this year. The sky’s the […]
[…] if you’re looking for more Rag Rug Inspiration, take a look at our Ribbon Weaving with Blanket Yarn post. We offer step by step instructions on how to make your own ribbon woven cushion […]