There are many questions whizzing through people’s heads when they first start to rag rug. I’ve already answered a few of these crucial rag rug questions in my first blog post “7 Questions a Rag Rug Beginner May Have” and below is Part 2 with questions supplied by some of our wonderful Ragged Life fans, which includes both rag rug beginners and experienced raggers alike. I do hope you find it useful and if you have a question you’d like for us to answer in our next blog post, please do comment at the bottom of the post. Here it goes…
Rag Rug Beginners’ Questions Answered:
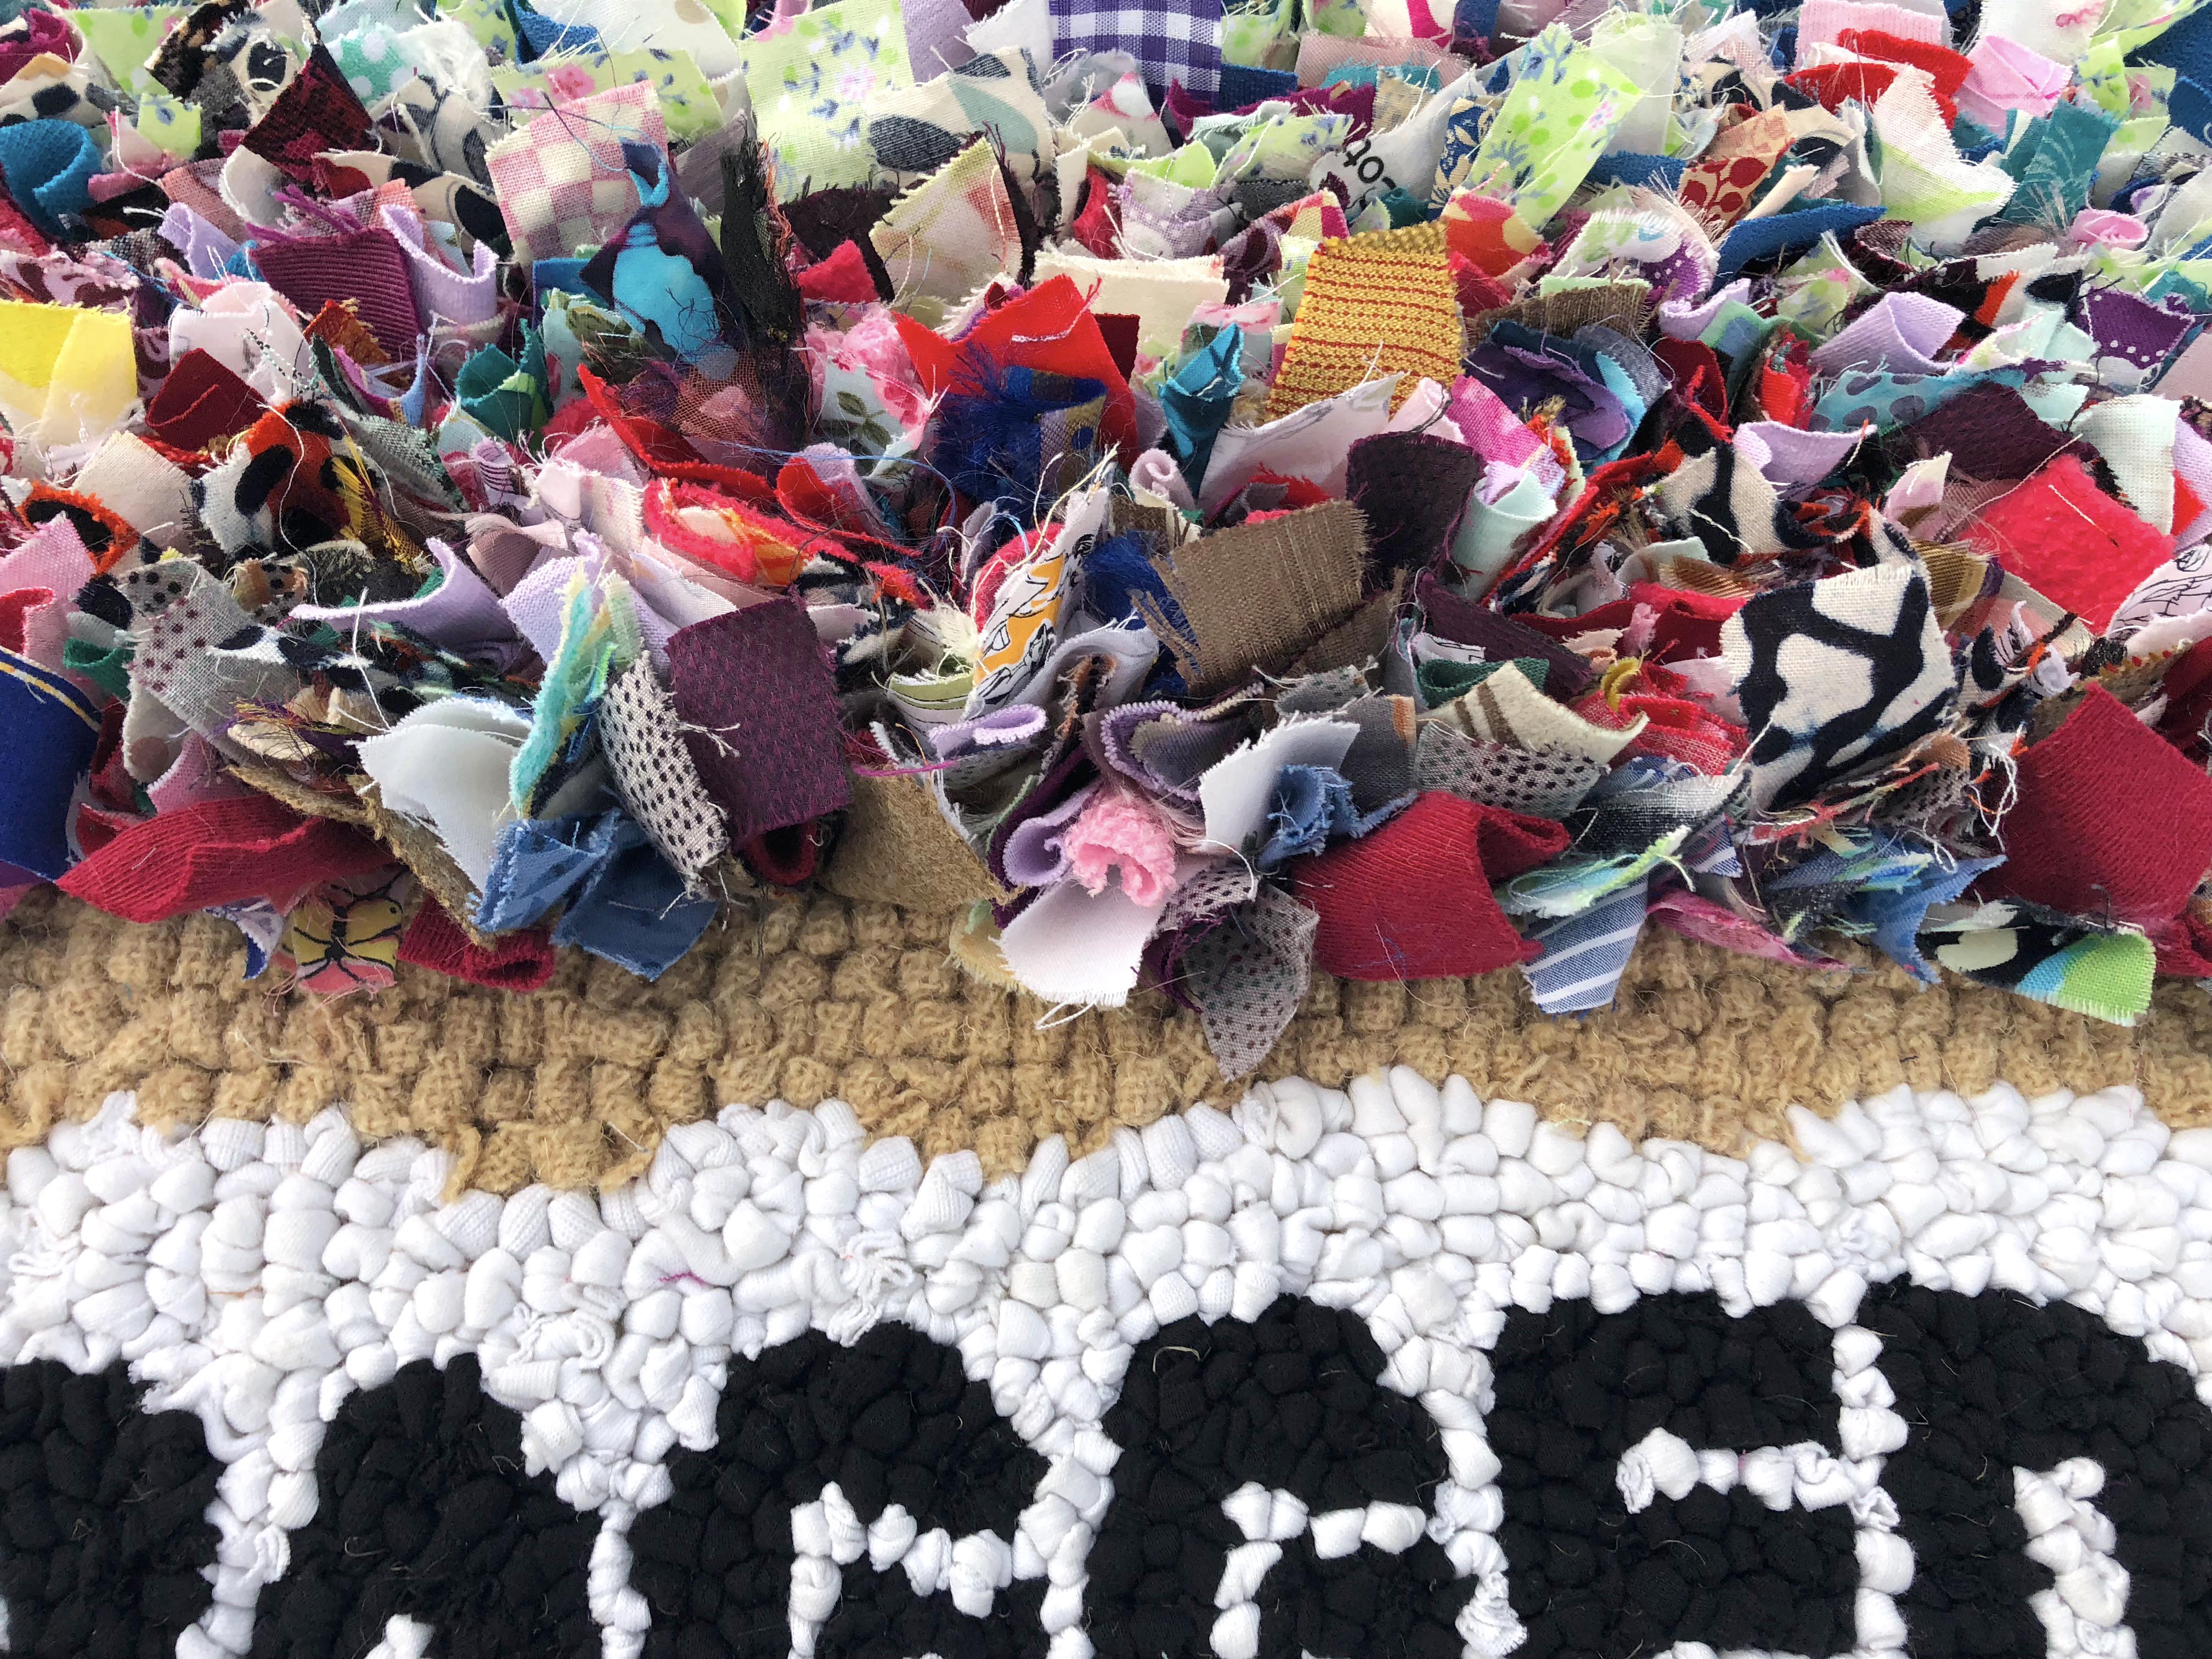
One small caveat before we get started. The questions and answers below refer to the traditional British styles of rag rugging, which are largely divided into the shaggy (proggy, proddy, clippy) and loopy (hooked) techniques. This is a reminder of what they look like. The shaggy technique is at the top and the loopy technique is below.
And here it goes with the questions…
Q1: What size strips do I need to cut to rag rug with?
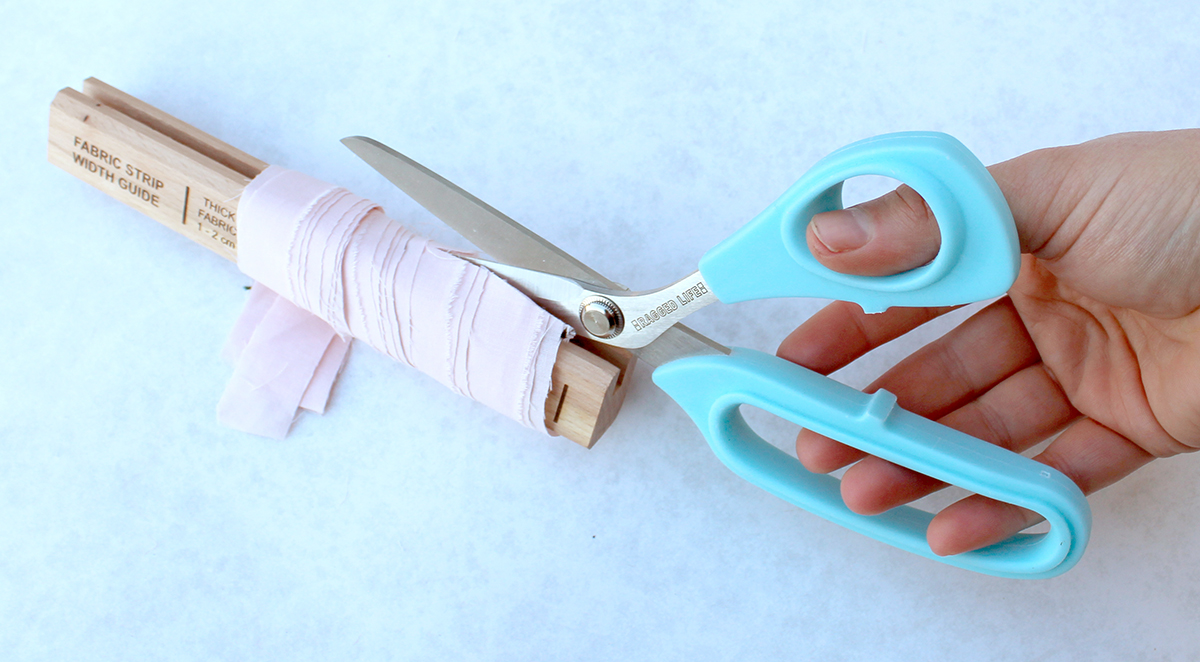
For the shaggy technique of rag rugging, I cut my strips 2cm in width and approx 9cm in length for most projects (rugs, cushions, wreaths etc..). However, that 2cm width is based on a medium weight fabric, such as jersey or cotton. For thicker fabrics, you need to cut your strips narrower (I cut denim only 1cm in width, for example). For thinner fabrics, such as chiffon or voile, you cut your strips wider (up to 8cm in width) to give them enough body to wedge into the hessian and not fall out. The fabric strip should pull through the hessian smoothly with only a bit of resistance. If you are struggling to pull your fabric strip through then you’ve cut it too wide.
To cut the fabric pieces 9cm in length, first I make long strips (for how to do that, check out this Ragged Life video) then I use a rag rug cutting gauge (which is a bit like a pom pom maker) to make them consistent in length. See the cutting gauge in action here. It makes the process much quicker!
9cm is a decent length for most projects, but you can also play around with and deliberately cut your strips shorter or longer for texture and design. In the Ragged Life Rag Rug Mini Wreath below I cut my strips 3cm in length for a shorter pile. However, the shorter the shaggy rag rug pieces, the more likely they are to fall out over time, so I wouldn’t recommend this for practical projects, such as rugs and cushions. If you’d like a shorter pile for those projects, I’d recommend doing the “Short Shaggy” technique of rag rugging.

For the loopy technique of rag rugging, your strips should be as long as possible (whether that’s only the length of a sock or the length of a sheet) and cut slightly narrower than you would for the shaggy technique. When you loopy rag rug, the fabric strip will pass twice through a single hole of the hessian, so if you cut your strips too wide, you’ll struggle to pull the fabric through smoothly and easily. I cut medium weight fabrics approx 1-1.5cm in width, but this obviously depends on how tight or loose your hessian is.
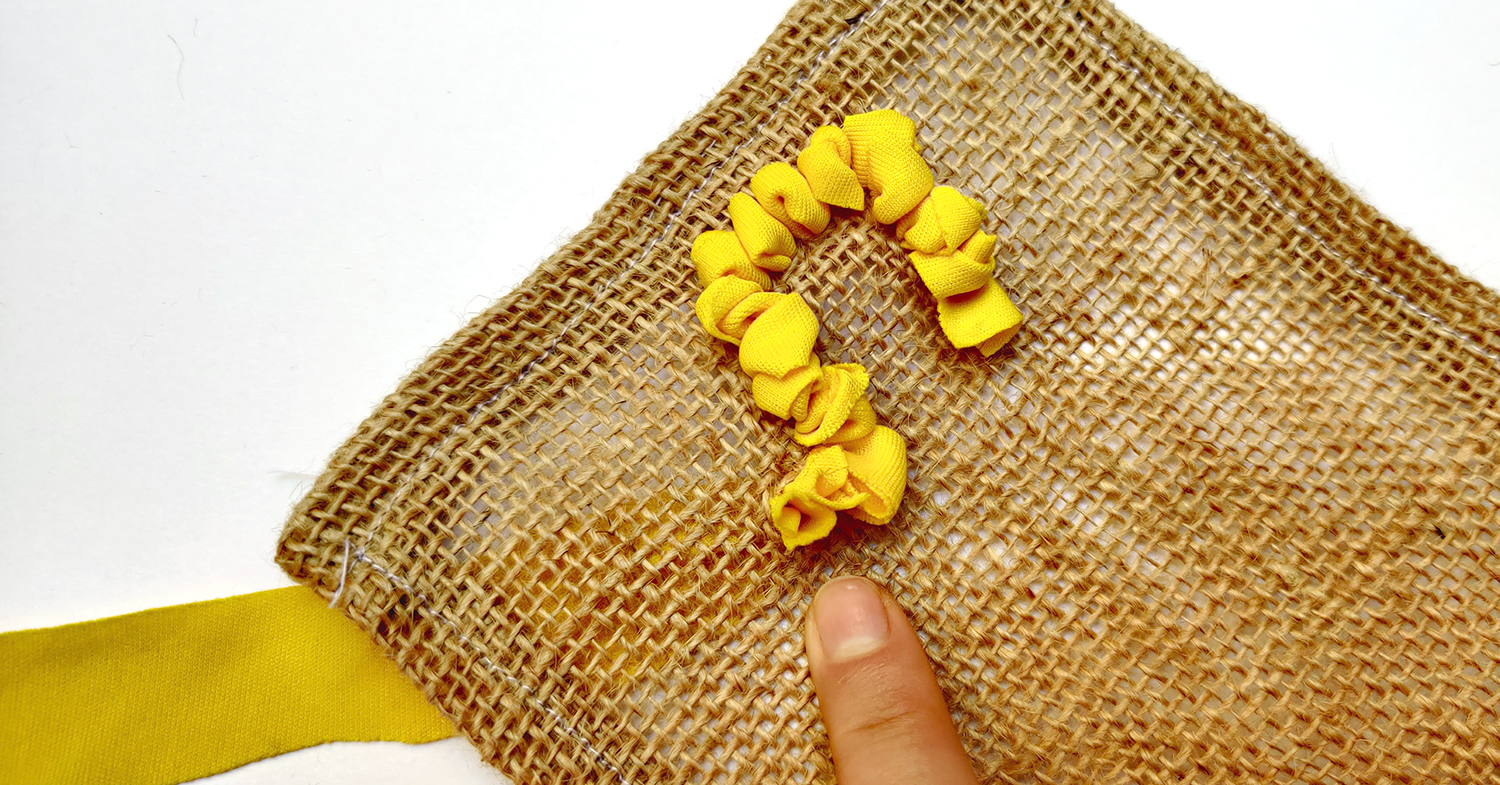
Q2: In the loopy technique, do the loops have to go one way or be a certain height?
If you’re using the same colour, it doesn’t really matter which way you rag rug your loops (in rows, spiralling outwards from a point, outside inwards, inside outwards etc…) as the loops form little bobbles that butt up against each other and the direction isn’t visible once you are finished and the hessian is full. People only really notice the overall effect, where the colour is more impactful.
However, if you plan to change colour or there’s any possibility that you may run out of a particular shade (very relevant if you’re filling in a big background) then the direction is important as it will become part of the pattern. In most cases, if I have a design feature, I prefer to outline it then work my way inwards in concentric rows. This means that if I run out of a colour, the feature stays balanced colour-wise, rather than looking “blocky”. You can see this shown in the rays of the “You are my Sunshine Rag Rug” below…
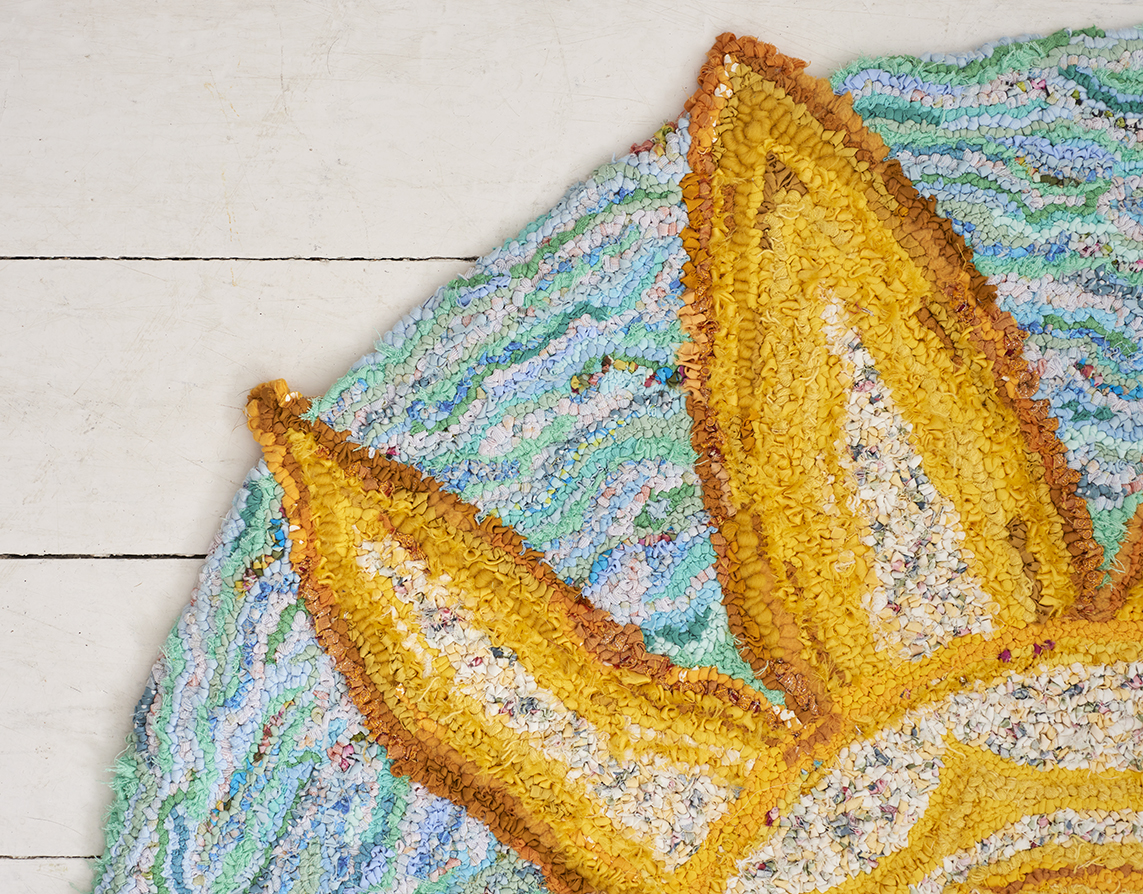
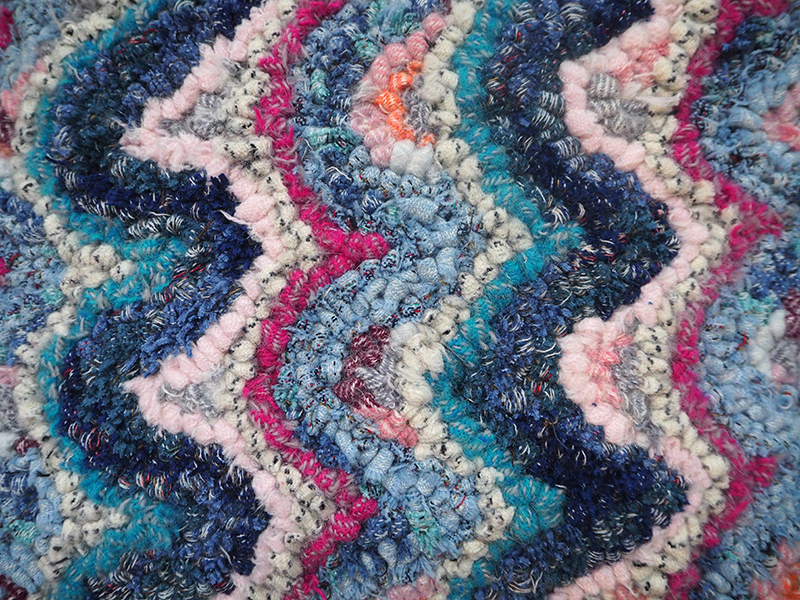
However, when it came to filling in the blue background behind the sun, I could have done it in a number of different ways. 1) working in curved horizontal rows from the outer edge of the rug inwards or from the body of the sun outwards. 2) Filling in the gaps surrounding the rays in concentric “triangles” outside inwards. 3) Rag rugging vertical rows along the long edges of the rays. 4) In a pattern of its own e.g. spots or spirals. 5) In an organic, random manner with wiggly lines like above. There were even more options than this!
None of these would have been wrong. They just all would have created very different rugs. My advice is, think about what you’d like to achieve before committing. e.g. do you want the feeling of movement? Do you want the area to look complex or let the design feature stand out stronger? How many different colours do you think you have and how would you like them to blend?
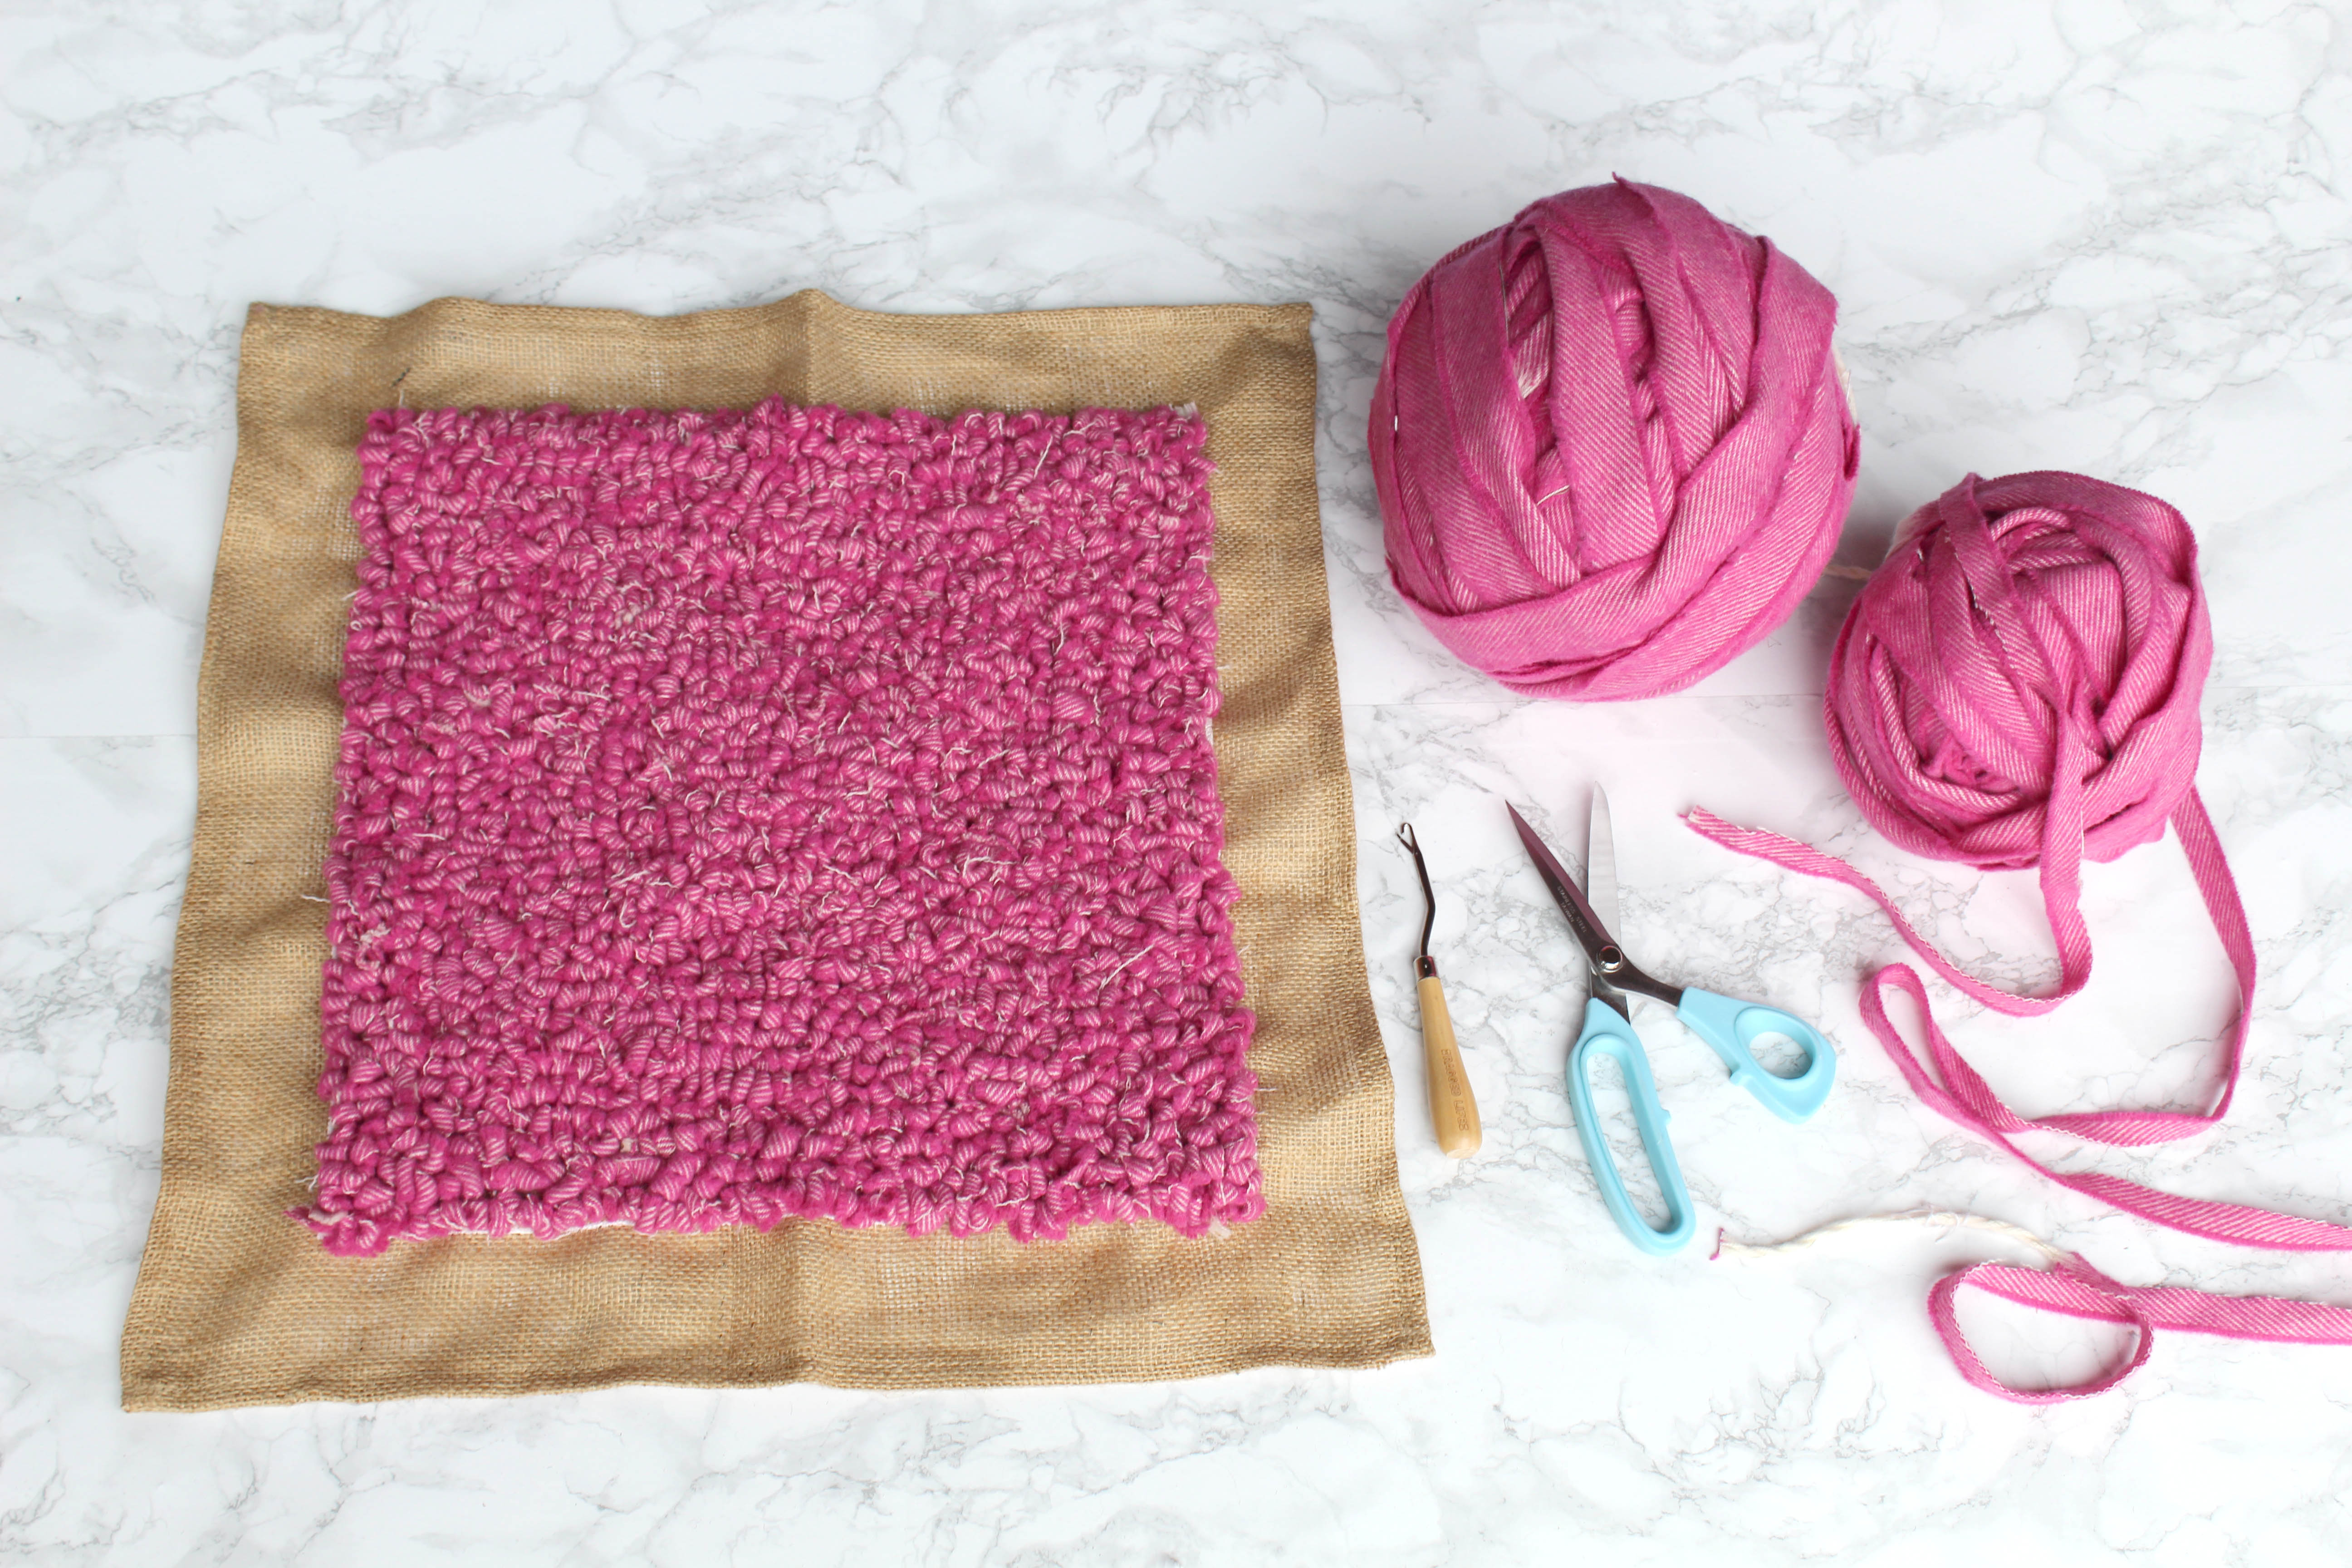
In terms of the loop height, they don’t have to be a specific height. I make mine anywhere between 0.5 and 5cm. Smaller loops are better for more complex designs where you need to build in a lot of detail, where as long loops look like petals and are more similar in appearance to the shaggy technique. Before choosing, bear in mind that with smaller loops it takes longer to cover the hessian and it creates a less cushy feel. Also, rag rug beginners sometimes leave hessian showing between their loops when they try to make them too short as they don’t do them close enough together (to compensate for the lack of fabric coverage). A good height of loops for rugs is 1-2cm. Don’t worry if the loops look too long when you only have one row, they’ll look great once you’ve built in more rag rugging to build up a level “ledge”.
Q3: How far apart should I place the strips in the shaggy technique?
When I teach students, I generally start them off with a rule of leaving 2-3 strands between each piece of fabric and the next, but to leave more space between one row and the next (generally 4-5 empty rows between each row). However, I only do this as rag rug beginners like rules. As you gain more confidence, really you should check how the hessian is tightening and adjust your spacing accordingly as the rule isn’t fool-proof. The hessian comes in different gauges (my rule is based on our Ragged Life hessian, which is 10 holes per inch) and there are so many other variables that impact spacing. Thicker fabrics or strips that have been cut wide tighten the hessian more than thin fabrics or those that have been cut narrower. Thicker fabrics generally need to be spaced further apart, where as thinner fabrics should be placed closer together. The aim of the game is for the hessian between your fabric pieces to have closed up, but still lie flat. If you place your pieces too close together then the hessian will begin to buckle and warp. If you space your rows too close together then your rug will curl.
Beginners have a tendency to rag rug too close together as opposed to too far apart, so if you’re unsure, generally choose the hole further away from the one you were considering.
Q4: Do I need to use a frame to rag rug?
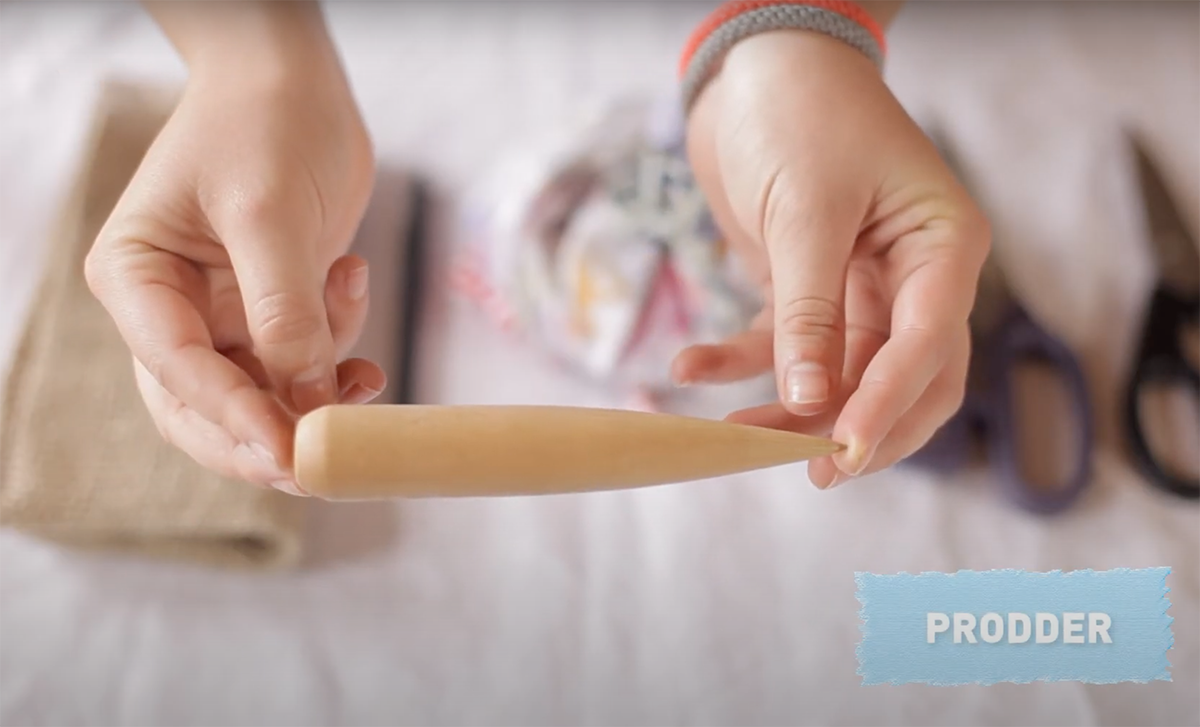
I never use a frame when I rag rug because the techniques and tools I use mean I don’t need one. For the shaggy technique, I use a Rag Rug Spring Tool to rag rug from the front of the hessian, which doesn’t require a frame. If, however, I were to use a prodder and build up the shaggy rag rugging from the back of the hessian, I would need a frame to hold the hessian taut enough to poke the fabric pieces through. This method is particularly traditional in the North East of England and you can see it demoed at Beamish Museum.
For the loopy (hooked) technique of rag rugging, you can choose whether to use a frame to hold your hessian taut or not to use one. Personally, I’ve never used a rag rug frame as I like to work with the loose hessian on my lap and manoeuvre it around manually. Over time, I have developed a way of holding the hessian which keeps the specific area I’m hooking into taut, but not the surrounding area. At first, you feel like you need a third hand to do this, but gradually it becomes second nature.
If you’re unsure whether to invest in a rug frame then you should try with an embroidery hoop first to see whether you prefer having the hessian taut or not.
Q5: What’s a good project a rag rug beginner could start with? Can I make a small piece into something else, eg a bag
Rag rugging is not a difficult craft. I always tell beginners to think about a few things before choosing their first project.
1) How much time do you want to spend on it? A rug will take you minimum of fifty hours as a beginner – are you willing to put the time in over multiple months? If not, maybe a small project like a rag rug bouquet or rag rug wreath is a good place to start as they can be made in just a couple of evenings whilst you see how you enjoy the process.
2) How much assembly do you want to do at the end? A rug is super easy in this respect as once you are done with the rag rugging there is no “finishing” needed. Just lay it on the floor and “hey presto!” A cushion, however, will need sewing together in some way, so some sewing skills are required. A wall hanging would need hanging in some way.
3) Is your item 3D? 3D projects like assembled hessian shopping bags are a small, practical project, but are slightly trickier if you want to do the loopy technique. This is because the loopy technique requires you to hold your fabric on the underside of the hessian, which in the case of the shopping bag would be inside of it. It is much harder to see what you are doing!
4) Design is key. Regardless of what project you choose, I always recommend that rag rug beginners start with a simple geometric design that they can fill paint-by-numbers style. At the beginning it is much more fun not having to think too carefully about the design itself. Stripes, checks, spots and simple shapes are great for newbie rag ruggers. If you don’t want to think about the design at all, you can even buy our Ragged Life pre-printed hessian which is already marked out so you can simply fill in the shapes in the colours of your choice.
And, finally, there’s no reason why you couldn’t make smaller pieces of rag rugging larger. You could either stitch small hemmed pieces of rag rugging to other projects, such as cushions or bags, or to each other. Or, if your rag rugging has empty hessian around it, you can join it to other bits of hessian by rag rugging through two layers of the hessian to bind them together seamlessly. The Ragged Life Rag Rug Spring Tool is brilliant for this job
And that’s all folks! I do hope you found the information useful and please do comment below with any questions you may have or follow us on social media below.
Happy rag rugging,
Elspeth
Follow us on Facebook, Instagram or YouTube below:
Instagram: https://www.instagram.com/raggedlife/
Facebook: https://www.facebook.com/raggedliferagrugs/
Pinterest: https://www.pinterest.co.uk/raggedlife/
Twitter: https://twitter.com/raggedlife